
In winter, the first 14 days decide how the whole broiler batch will turn out. A day-old chick cannot keep itself warm. For the first week it depends fully on the heat you give it, and by day 7 it should already weigh about 4.5–5 times its day-old weight. If it gets cold now, it does not absorb its yolk properly, it eats and drinks less, the flock becomes uneven, FCR goes up and the risk of ascites and respiratory problems rises later in the batch. The money is made or lost in the brooding period.
This guide walks you through everything from preparing the shed before the chicks arrive to the end of day 14: a day-wise temperature chart, heaters and gas safety, the first 24 hours, how to read chick behaviour, space, ventilation, humidity, light, and a daily checklist you can print and hang in the shed.
1. Shed preparation: 24–48 hours before the chicks arrive
Most winter brooding failures start before the chicks even come. If the chick box is opened onto a cold floor, the damage is done in the first few hours.
Clean, dry and disinfected shed
- Finish washing and disinfection of the shed, feeders and drinkers several days before placement, so the floor and walls are fully dry. A damp floor stays cold for days.
- Fix broken nets, holes in walls and gaps under the roof. Keep rats and cats out.
Curtains: double layer, closed from the bottom
- Use a double curtain on open sides: an inner layer (plastic or tarpaulin) and an outer layer (gunny or tarpaulin). Seal gaps at the sides and the bottom so cold air does not blow over the chicks.
- Fit curtains so they open from the top (top flap lowered), not lifted from the bottom. Cold air entering from the top mixes with warm air before it reaches the chicks.
- Inside a large shed, an extra inner curtain or plastic sheet to make a smaller brooding room keeps fuel costs down.
Litter: dry and deep
- Use dry rice husk (or dry sawdust/wood shavings), about 4 inches (around 10 cm) deep in winter. Never use damp, dusty or mouldy material.
- Spread it evenly. Thin spots let the cold of the floor come through.
- In the brooding area, cover part of the litter with paper (newspaper or chick paper) for the first 2–3 days and sprinkle feed on it so chicks find feed easily.
Pre-heating: warm the floor, not just the air
- Switch the heaters on at least 24–36 hours before the chicks arrive, and up to 48 hours in severe cold or in a big, cold shed.
- The goal is a litter (floor) temperature of 28–30°C and air at chick level of 32–33°C at the time of placement. Air warms fast; the floor takes much longer.
- Check the floor by pushing your hand into the litter, or with an infrared thermometer. A chick standing on cold litter loses heat through its feet even if the air is warm.
- Hang thermometers at chick height (5–10 cm above the litter), at least one near the heater and one at the edge of the ring, not near the roof. A min-max thermometer shows you how cold it got at night.
- Fill the drinkers a few hours before arrival so the water warms up to room temperature.
Brooder guard (chick ring) layout
- Make a round ring with a chick guard of cardboard, tin sheet or plastic, about 45 cm (18 inches) high. Round, with no corners, so chicks cannot pile up and smother in a corner.
- Put the heat source in the middle (or along one side for long brooding areas) so there is a warm zone and a slightly cooler zone. Chicks then choose where they are comfortable.
- Arrange feeders and drinkers in a ring or alternating pattern between the heater and the guard, not directly under the heater and not touching the guard. A chick should not need to walk more than about 1 metre to reach feed or water.
- Start the brooding area in one part of the shed (often the middle third) and widen it as the chicks grow. See the space table below.
2. Heaters for winter brooding and gas safety
Whatever heat source you use, the heat must be even across the ring, and it must keep running through the coldest hours of the night. Here are the common options in Indian broiler farms:
| Heater | Good points | Watch out for |
|---|---|---|
| Gas brooder (LPG hover/radiant) | Strong, even heat; easy to raise or lower; clean | Gas leaks at pipes and regulator, cylinder running out at night, burns CO and moisture into the shed air; needs some fresh air |
| Angithi / sigri (coal or wood, open) | Cheap, easy to get | Highest carbon monoxide (CO) and smoke risk, uneven heat, fire risk near curtains and litter, needs refuelling at night |
| Bukhari (closed stove with pipe chimney) | Cheap fuel; smoke goes out through the pipe; heats a large area | Pipe joints must be tight and the chimney must go fully outside; pipe gets very hot, keep it away from curtains and litter |
| Electric (bulbs, infrared lamps, heaters) | No smoke or CO, easy to control | Power cuts at night, high bill, bulbs alone are often not enough in severe cold; needs a backup |
- Never seal a shed completely when an angithi, bukhari or gas brooder is running. Always keep some fresh air coming in.
- Prefer a bukhari with a chimney pipe going outside over an open angithi. If you use an angithi, light it outside and bring it in only once the smoke has stopped, and keep it away from curtains.
- Signs in chicks: sleepy, weak, gasping, sudden deaths near the heater with no other cause. Signs in people: headache, dizziness, nausea. If you feel these in the shed, open the curtains and go out at once.
- Nobody should sleep inside a closed shed with a coal or wood heater burning.
- A low-cost CO alarm in the brooding area is worth buying; aim to keep CO under about 10 ppm.
- Check gas pipes and joints with soapy water, never with a flame. Keep a spare cylinder ready, and a fire extinguisher or sand bucket near the door.
Power cut plan: keep a generator or inverter for electric brooding, or a backup gas/bukhari heater. One cold night without heat in the first week can undo all your work.
3. Chick arrival protocol: the first 24 hours
When the chicks come in
- Check that the shed is at temperature before you open the boxes: floor 28–30°C, air at chick level 32–33°C.
- Count the chicks and check quality: active, bright eyes, dry and well-healed navels, no red hocks. Write down the hatchery, breed, batch, chick weight and the vaccines given at the hatchery.
- Weigh a few boxes of chicks to know the average day-old weight. You will need it on day 7.
- Unload quickly and place chicks gently near feed and water. Do not leave boxes stacked in a cold vehicle or in the sun.
First water
- Water should be clean and lukewarm (about 20–25°C), never ice-cold from a tank and never hot.
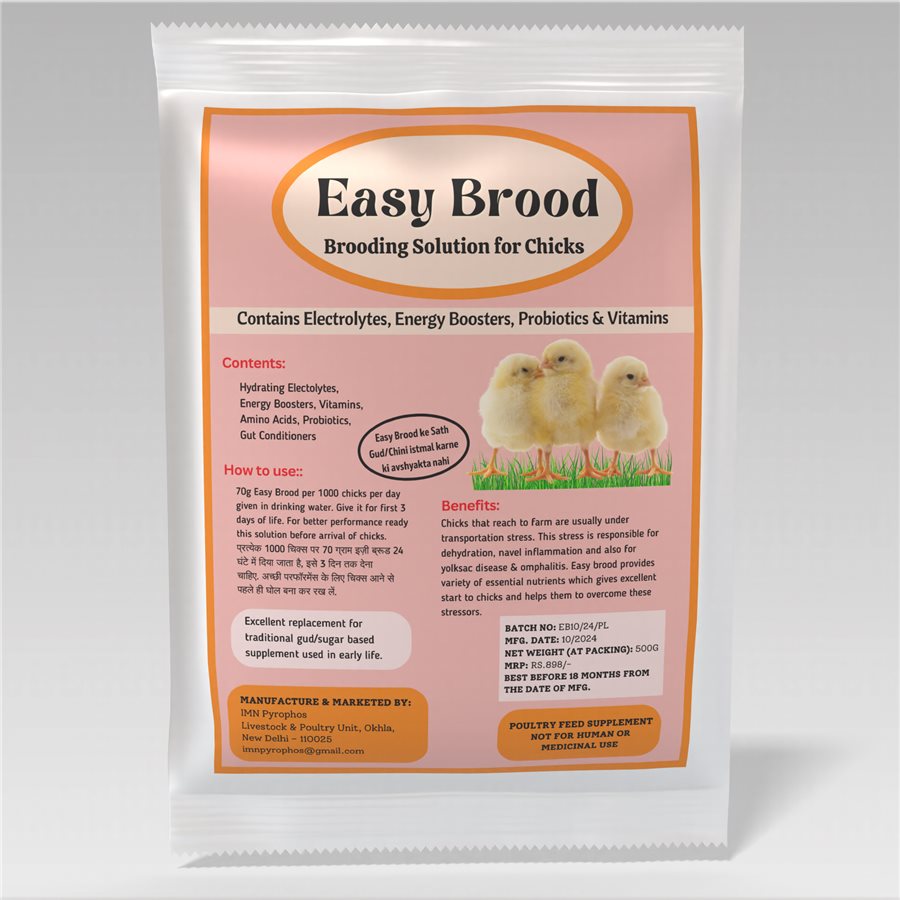
- Do not give jaggery (gud), sugar or salt water: sugar feeds harmful gut bacteria and can cause loose droppings and yolk sac infection. Use Easy Brood instead (see the day 1 to 4 plan below).
- Dip the beaks of a few chicks in water so they learn where the drinkers are. Others follow.
- For nipple lines, keep the nipple at chick eye level in the first days and make sure a drop of water hangs on each nipple.
First feed
- Give a good quality pre-starter crumble from the start. Sprinkle it on the paper and fill the chick trays so feed is everywhere the chicks walk.
- Give feed little and often in the first days, so it stays fresh and the sound of feeding attracts chicks.
Crop-fill check
This is the simplest test of whether your brooding is working. Pick up 10–20 chicks from different parts of the ring and gently feel the crop (the pouch at the base of the neck).
- About 8 hours after placement: at least 80% of chicks should have a full, soft crop with both feed and water.
- At 24 hours: more than 95%.
- A hard crop (only dry feed) means the chick is not drinking enough. An empty crop means it has not found feed or water, or it is too cold to move. Check temperature, water and feeder space at once.
Day 1 to 4 start-up plan: Easy Brood + Alceau
This is the first part of the IMN Pyrophos winter 2026 schedule. Quantities are per 1,000 chicks. “First water” is the morning water; “next water” is the water you give after the first one is finished.
| Day | First water | Next water |
|---|---|---|
| Day 1 | Easy Brood 70 g, ready in the drinkers when the chicks arrive | Vitaden H 30 ml |
| Day 2 | Easy Brood 70 g | Alceau 15 g |
| Day 3 | Pyrocal B 40 ml | Alceau 15 g |
| Day 4 | ND-IB vaccine (nothing else in the vaccine water) | Alceau 15 g |
Make the solution fresh and give only as much as the chicks finish. Never mix any medicine or supplement in the vaccine water. From day 5 follow the full 42-day winter schedule.
First 3 days · in place of jaggery water
Easy Brood
Start-up solution for chicks with electrolytes, osmolytes, glucose for energy, vitamin C and B vitamins, betaine, glycine and probiotics. Reduces transport stress and dehydration, helps early navel healing, and lowers the chance of yolk sac infection and early mortality. No need for jaggery, sugar or salt solutions. Antibiotic free. Also in 250 g (₹295).
Dose: 3–4 g per litre of drinking water for the first 72 hours, which is 50–70 g per 1000 chicks per day. Prepare the solution before the chicks arrive.
500 g ₹565MRP ₹898
Herbal antimicrobial · bestseller
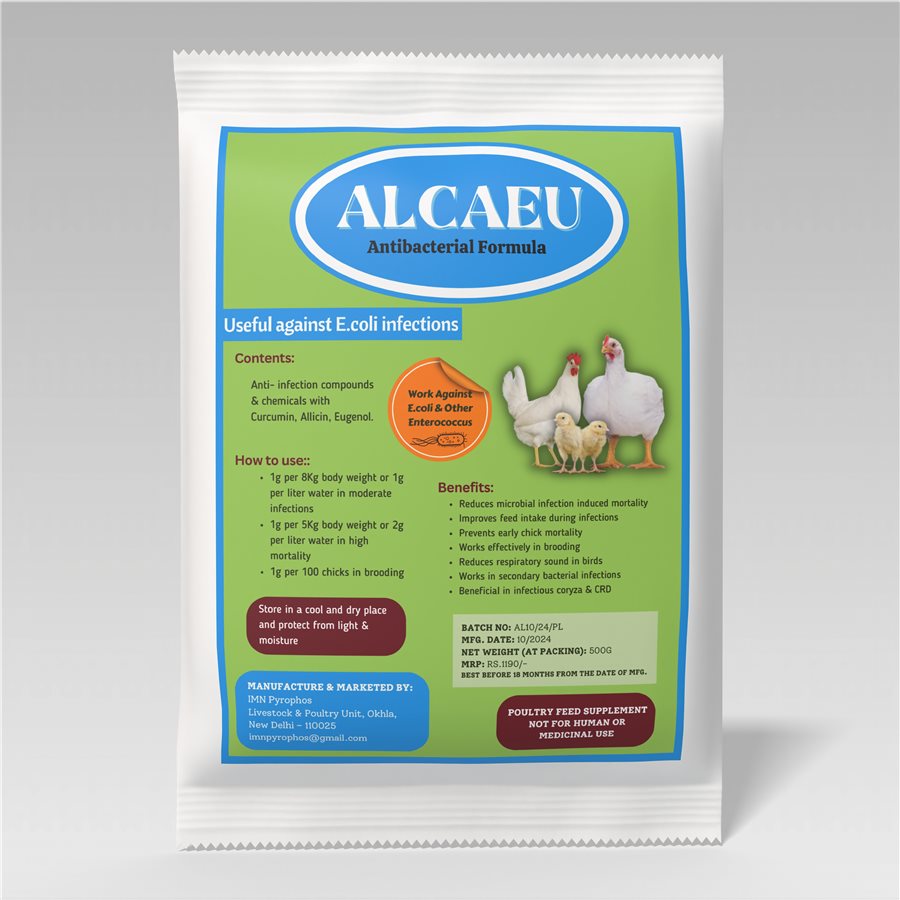
Alceau
Herbal formula from onion, garlic, tulsi and cinnamon extracts. Helps prevent early chick mortality in brooding (day 2–7), helps yolk absorption, and helps reduce deaths from respiratory infections such as CRD and from bacterial infections. Also in 250 g (₹395).
Dose: in the IMN winter schedule 15 g per 1,000 chicks in the next water on days 2, 3 and 4 (and 100 g per 1,000 birds on day 21); moderate infection 1 g per 8 kg body weight or 1 g per litre of water; in feed 1 kg per tonne.
500 g ₹741MRP ₹1,190
Product details: Easy Brood · Alceau.
4. Day-wise brooding temperature chart (day 1 to 21)
These are air temperatures at chick level (5–10 cm above the litter) in the area where chicks rest. Keep the litter at 28–30°C in the first days. Lower the temperature slowly; never drop 3–4°C in a single day. Different breeds and hatcheries give slightly different charts, so follow your hatchery or breed manual where it differs, and always check the chicks themselves.
| Day | °C at chick level | °F (approx.) | Note |
|---|---|---|---|
| Day 1 | 32–33 | 90–91 | Floor 28–30°C before chicks arrive; crop check at 8 h |
| Day 2 | 32–33 | 90–91 | Crop check at 24 h; watch at night |
| Day 3 | 32–33 | 90–91 | Start removing paper as it gets dirty |
| Day 4 | 31–32 | 88–90 | First widening of the ring |
| Day 5 | 31–32 | 88–90 | |
| Day 6 | 30–31 | 86–88 | |
| Day 7 | 30–31 | 86–88 | Weigh chicks: 4.5–5x day-old weight |
| Day 8 | 29–30 | 84–86 | Widen the ring again |
| Day 9 | 29–30 | 84–86 | |
| Day 10 | 29 | 84 | Slowly increase ventilation |
| Day 11 | 28–29 | 82–84 | |
| Day 12 | 28–29 | 82–84 | |
| Day 13 | 28 | 82 | |
| Day 14 | 28 | 82 | Weigh again; most chick guards can go |
| Day 15–16 | 27–28 | 81–82 | Keep heat ready for cold nights |
| Day 17–18 | 27 | 81 | |
| Day 19–20 | 26–27 | 79–81 | |
| Day 21 | 26 | 79 | After this, 21–26°C as the birds grow |
Under a gas brooder or near a bukhari the spot directly under the heat will be hotter than this table, and the edge of the ring cooler. That is fine, as long as the chicks rest in a wide, even circle around the heat.
5. Read the chicks, not just the thermometer
The thermometer tells you the air; the chicks tell you how they feel. Look at them quietly from the door before you walk in.
| What you see | What it means | What to do |
|---|---|---|
| Chicks huddled tightly under or near the heater, loud distress chirping | Too cold | Add heat, lower the brooder a little, check for draughts and a cold floor |
| Chicks far away from the heater, near the guard, panting with open beaks, wings drooping | Too hot | Reduce heat or raise the brooder; give a little more air |
| Chicks crowded on one side of the ring | Draught from the other side, or uneven heat or light | Find and close the gap; check curtains and the heater position |
| Chicks spread evenly, some eating, some drinking, some resting; soft chirping | Comfortable | Keep it this way |
| Chicks lying flat and still, sleepy, gasping near a coal or gas heater | Possible gas (CO) problem | Ventilate at once, check the heater and chimney |
Two more tricks: hold a chick’s feet against your cheek or neck; cold feet mean a cold floor. And the most important check of the day is at 2–4 am, the coldest part of the night, when heaters run low and most chilling happens.
6. Stocking density and gradual expansion
Starting chicks in a smaller area saves fuel and keeps them close to heat, feed and water. But if you do not widen the area on time, chicks get crowded, the litter gets wet and growth slows. As a general guide for open-sided sheds:
| Age | Floor space per chick (approx.) | Chicks per sq ft (approx.) | What to do |
|---|---|---|---|
| Day 1–3 | 0.3–0.35 sq ft | 3–3.5 | Small ring around the heat |
| Day 4–7 | 0.4–0.5 sq ft | 2–2.5 | Widen the guard every 2–3 days |
| Day 8–14 | 0.6–0.75 sq ft | 1.3–1.7 | Remove guards step by step, open more of the shed |
| Day 15–21 | 0.8–1 sq ft | 1–1.25 | Full shed by about day 18–21 |
- Widen the ring in the warmer daytime, not in the evening.
- Before opening a new part of the shed, warm it and its litter first, so the chicks do not walk onto a cold floor.
- Move feeders and drinkers out with the guard so they stay evenly spread.
- Final density depends on your shed, season and target weight. Many farms keep around 1 sq ft per bird for a 2–2.5 kg broiler; follow your integrator or vet for your shed.
7. Feeder and drinker spacing
| Equipment | Day 1–7 (approx.) | Day 8–14 (approx.) |
|---|---|---|
| Chick feeder tray / paper | 1 tray per 100 chicks, plus feed on paper for 2–3 days | Change slowly to tube or linear feeders |
| Tube/round feeder | Add from day 4–5 next to the trays | About 1 per 30–40 birds (depends on size) |
| Jar/fount drinker (3–5 L) | 1 per 50–75 chicks | Add bell drinkers as the birds grow |
| Nipple drinker | About 1 nipple per 10–15 chicks, nipple at eye level | Raise the line so birds drink with a slight upward stretch |
- Keep the drinker lip at the height of the chick’s back as they grow, so water is not spilled into the litter.
- Clean jar drinkers every day. Feed and water troughs should never stay empty.
- Remove wet litter around drinkers every morning and add dry husk. For more, read wet litter and loose droppings in winter.
8. Gut health support in the brooding period
A chick’s gut is almost empty of good bacteria when it hatches. The first days decide which bacteria settle there. Good brooding (warmth, early feed and clean water) is the base. Alongside it, many farmers give a probiotic in the first days to help build healthy gut flora, support yolk absorption and keep droppings normal.
Gut health · bestseller
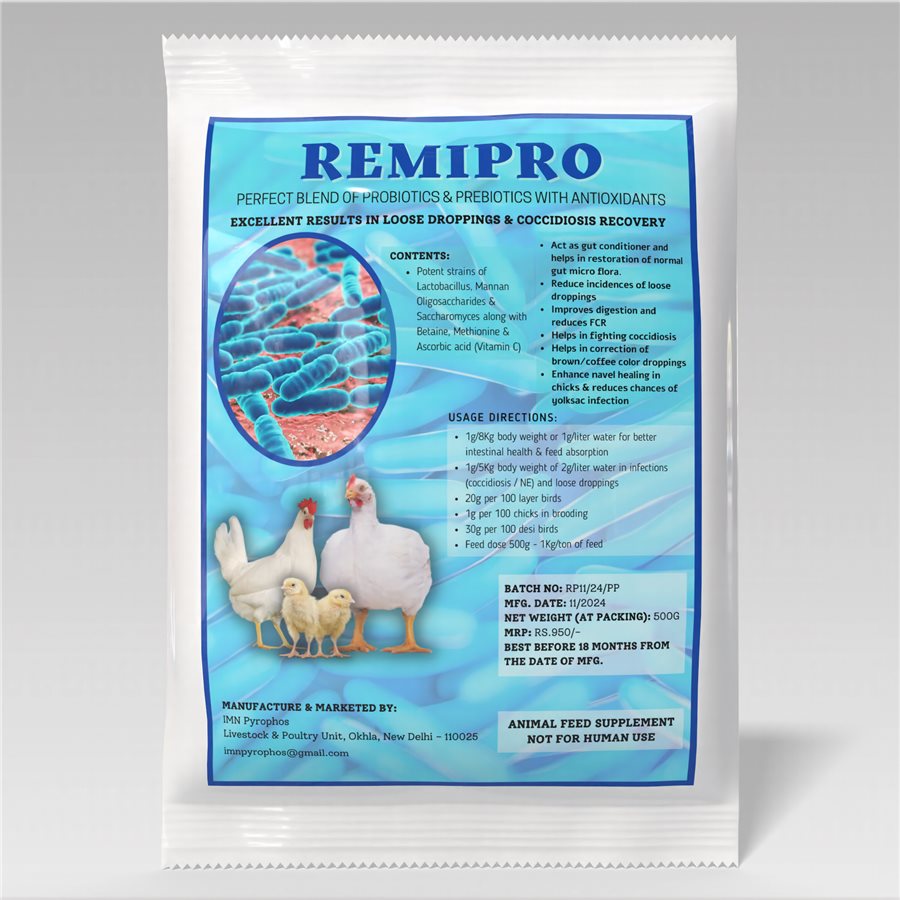
Remipro
Probiotics, prebiotic (MOS) and Saccharomyces with betaine, methionine and vitamin C. Restores healthy gut flora, reduces loose droppings, improves digestion and FCR, supports navel healing and helps reduce yolk sac infection in chicks.
Dose: in brooding, 1 g per 100 chicks; routine gut health 1 g per 8 kg body weight or 1 g per litre of water; for loose droppings and infections 1 g per 5 kg body weight or 2 g per litre.
500 g ₹626MRP ₹950
Product details: Remipro. A probiotic does not replace warmth or clean water; if chicks are cold, fix the temperature first.
9. Minimum ventilation vs heat retention
This is the hardest balance in winter. Farmers close everything to save heat, but chicks still need oxygen, and the shed must get rid of moisture, ammonia and the gases from heaters. A closed, damp shed is a major cause of CRD, E. coli and infectious bronchitis. Read about infectious bronchitis (IB) in poultry, which spreads fast in poorly ventilated winter sheds.
- Minimum ventilation means a small, regular exchange of air, not opening the shed wide. Even on the coldest night there should be some fresh air coming in.
- In curtain sheds, lower the top flap of the curtain a few inches on the side away from the wind, especially in the warm afternoon hours. Never lift curtains from the bottom.
- If you have exhaust fans, run them on a timer (for example a short run every few minutes) rather than full-time.
- The nose test: if you smell ammonia or your eyes sting when you walk in, ventilation is too low. Aim to keep ammonia below about 10 ppm. Heavy moisture on the inside of curtains in the morning also means too little air.
- Keep incoming cold air above the chicks, not on them. Draughts at bird level chill chicks even when the thermometer looks fine.
- Increase ventilation step by step after day 10, as the birds produce more heat and moisture.
For full winter shed management, see winter management in poultry farming.
10. Humidity
- In the first days, a relative humidity of about 60–70% keeps chicks from drying out. After the first week, around 50–65% is fine.
- Too dry (common with coal and electric heaters): chicks dehydrate, dust goes up, and early mortality and dry, pasted vents increase. Keeping water in open trays near the heater, out of chicks’ reach, or lightly misting the walkway can help.
- Too wet (common in closed sheds): wet litter, ammonia, cold floor, foot and gut problems. Increase minimum ventilation and remove wet litter.
- A cheap digital thermo-hygrometer hung at chick height shows both temperature and humidity.
11. Lighting programme in the first two weeks
- Days 1–7: nearly continuous light (about 23 hours light, 1 hour dark) with bright, even light at chick level, so chicks find feed and water easily. The 1 hour of dark gets them used to a power cut without panic.
- From day 7–8: slowly give a longer dark period (step by step to about 4–6 hours of dark per night), and reduce light brightness. A dark period helps leg health, immunity and steady growth.
- Avoid dark corners and strong shadows in the brooding area; chicks crowd into the bright spots.
- Follow your breed manual or integrator’s programme if they give a different one.
12. Weighing at day 7 and day 14
- On day 7, weigh at least 50–100 chicks (or about 1–2% of the flock) taken from different parts of the ring.
- Target: about 4.5–5 times the day-old weight. A 40 g chick should weigh about 180–200 g on day 7.
- If the average is low, look first at brooding temperature (especially at night), water access, feed on paper, feeder space and chick quality.
- Also look at uniformity. If many chicks are very small, split them into a separate pen near the heat with extra feed and water.
- Weigh again on day 14 and compare with the weight chart of your breed (your hatchery or integrator can give it).
- First-week mortality should usually stay under 1%. If it is higher, call your vet and send dead chicks for post-mortem.
13. Supporting immunity and vaccination in the cold
Cold, transport, crowding and the first vaccinations all stress young chicks. Follow the vaccination schedule from your hatchery or vet (it varies by region and integrator). Give vaccines in clean, cool, sanitizer-free water in the morning. Our winter broiler medicine schedule shows where each step fits. Around vaccination and in stressful cold spells, an antioxidant immunity support can help:

Immune booster
Nexamune
Vitamin E, selenium, amla, tulsi and ashwagandha extracts, vitamin C, vitamin D and niacin: an antioxidant shield that supports immunity. Supports the immune system in outbreaks like IB, ND, Gumboro, IBH and LPAI, reduces the severity of CRD and other respiratory problems, and helps reduce the chance of vaccination failure.
Dose: 1 ml per litre of water or 15 ml per 100 birds for immunity and stress; 2 ml per litre of water before and after vaccination; 25–30 ml per 100 birds during viral outbreaks.
1 L ₹644MRP ₹1,190
Product details: Nexamune. Give supplements in fresh water as the label says, and do not give any medicine or antibiotic on guesswork; ask your vet first.
14. Day 1 to day 14 daily checklist
| Day | Temp at chick level | Key jobs |
|---|---|---|
| Before arrival | Floor 28–30°C, air 32–33°C | Pre-heat 24–48 h, litter 4 inches, double curtains, ring ready, drinkers filled, CO and gas check, backup heat ready |
| Day 1 | 32–33°C | Count and check chicks, weigh sample, Easy Brood 70 g/1000 on arrival then Vitaden H 30 ml, feed on paper, dip beaks, crop check at 8 h, night check |
| Day 2 | 32–33°C | Easy Brood 70 g, then Alceau 15 g, crop check at 24 h (over 95%), remove weak chicks, refill feed often, check the 2–4 am behaviour |
| Day 3 | 32–33°C | Pyrocal B 40 ml, then Alceau 15 g, remove dirty paper, clean drinkers, record deaths, check humidity |
| Day 4 | 31–32°C | ND-IB vaccine in the morning water (nothing else in it), Alceau 15 g in the next water, First ring widening (in daytime), add a few tube feeders, wet litter removal |
| Day 5 | 31–32°C | Check navels and vents for pasting, look at droppings, follow vaccine schedule if due |
| Day 6 | 30–31°C | Adjust drinker height, check ammonia in the morning, fuel and gas stock |
| Day 7 | 30–31°C | Weigh 50–100 chicks (target 4.5–5x day-old weight), add first dark period, review first-week mortality |
| Day 8 | 29–30°C | Widen the ring, warm the new area first, move feeders and drinkers out |
| Day 9 | 29–30°C | Turn litter lightly, remove caked patches, check night temperature on min-max thermometer |
| Day 10 | 29°C | Increase minimum ventilation a little, check for draughts at bird level |
| Day 11 | 28–29°C | Remove some chick trays, rely more on tube feeders; check uniformity |
| Day 12 | 28–29°C | Follow vaccine schedule if due; clean water lines |
| Day 13 | 28°C | Open more of the shed, keep curtains closed at night, watch for respiratory sounds |
| Day 14 | 28°C | Weigh again, compare with breed chart, remove remaining guards, plan next two weeks |
Every day: morning dead count and records, feed and water filled, wet litter removed; afternoon top-curtain airing if sunny; evening curtains closed, heaters, gas and backup checked; 2–4 am chick spread, temperature and smoke/gas check.
15. Common winter brooding mistakes
- Starting heaters only when the chicks arrive. The air warms in an hour, the floor needs a day or more.
- Measuring temperature near the roof instead of at chick level, and only checking air, not litter.
- Sealing the shed completely for fear of cold, leading to ammonia, gas build-up, wet litter and respiratory disease.
- Open angithi inside a closed shed, or bukhari pipes leaking smoke.
- Ice-cold tank water on the first day.
- Too few drinkers and feeders, or placing them far from the heat.
- No night checks. Most chilling happens between midnight and dawn.
- Widening the ring or cutting heat too early, or doing it in the cold evening.
- Square corners in the brooding area, where chicks pile up and smother.
- Not weighing on day 7, so a poor start is found only at the end of the batch.
- Giving antibiotics on guesswork for early mortality instead of fixing brooding and calling the vet.
16. When to call the vet
Frequently asked questions
How many hours before chick arrival should I start the brooder in winter?
At least 24–36 hours, and up to 48 hours in severe cold or a big shed. The litter should reach 28–30°C and air at chick level 32–33°C before you open the chick boxes.
What temperature do broiler chicks need on day 1?
About 32–33°C (90–91°F) at chick level for the first 3 days, then lower slowly to about 30–31°C by day 7 and 28°C by day 14. Always confirm by watching how the chicks spread.
Is an angithi safe for brooding?
An open angithi gives off carbon monoxide and smoke and is the riskiest option. If you must use one, light it outside, bring it in only once the smoke stops, keep it away from curtains, and never seal the shed. A bukhari with a chimney or a gas brooder is safer.
Should I close all curtains at night in winter?
Close them to stop draughts, but leave a small opening at the top on the side away from the wind so some fresh air comes in. A fully sealed shed builds up ammonia, moisture and heater gases.
How much should a broiler chick weigh on day 7?
About 4.5–5 times its day-old weight, so roughly 180–200 g for a 40 g chick. Check against your breed’s weight chart.
Can I give sugar or glucose water to chicks?
Avoid jaggery, sugar and salt water. Sugar feeds harmful gut bacteria and can lead to loose droppings and yolk sac infection. On day 1 and 2 give Easy Brood 70 g per 1,000 chicks, and Alceau 15 g per 1,000 chicks in the next water on days 2, 3 and 4 (see the day 1 to 4 plan). After that, give plain clean lukewarm water.
When can I remove the chick guard?
Widen it every 2–3 days from day 4, and remove it step by step between about day 10 and 14, depending on the weather. Keep heat available for cold nights into the third week.
Related guides in this winter broiler series
Also useful: today’s broiler rate · poultry cost and profit calculator · wet litter in winter · IMN poultry products
This is general guidance. Also follow your breed manual and hatchery advice, and consult a vet before giving any medicine.
सर्दी में ब्रॉयलर ब्रूडिंग गाइड: दिन 1 से दिन 14 (तापमान, हीटर, हवा)
सर्दी में पहले 14 दिन ही तय करते हैं कि पूरा ब्रॉयलर बैच कैसा निकलेगा। एक दिन का चूज़ा खुद को गर्म नहीं रख पाता। पहले हफ्ते वह पूरी तरह आपकी दी हुई गर्मी पर निर्भर है, और 7वें दिन तक उसका वज़न एक दिन वाले वज़न का लगभग 4.5–5 गुना हो जाना चाहिए। अगर इस समय ठंड लग गई, तो चूज़ा अपनी ज़र्दी (yolk) ठीक से नहीं पचा पाता, कम खाता-पीता है, फ्लॉक बराबर नहीं बढ़ता, FCR बिगड़ता है और आगे चल कर जलोदर (ascites) और साँस की बीमारी का खतरा बढ़ता है। कमाई या नुकसान ब्रूडिंग में ही तय हो जाता है।
इस गाइड में चूज़े आने से पहले शेड की तैयारी से लेकर 14वें दिन तक सब कुछ है: दिन के हिसाब से तापमान चार्ट, हीटर और गैस से बचाव, पहले 24 घंटे, चूज़ों का व्यवहार कैसे पढ़ें, जगह, हवा, नमी, रोशनी, और रोज़ की चेकलिस्ट जिसे आप प्रिंट करके शेड में टाँग सकते हैं।
1. शेड की तैयारी: चूज़े आने से 24–48 घंटे पहले
सर्दी की ब्रूडिंग में ज़्यादातर गड़बड़ चूज़े आने से पहले ही शुरू हो जाती है। अगर चूज़ों का डिब्बा ठंडी ज़मीन पर खोला गया, तो पहले कुछ घंटों में ही नुकसान हो जाता है।
साफ, सूखा और कीटाणुरहित शेड
- शेड, फीडर और ड्रिंकर की धुलाई और कीटाणुनाशक छिड़काव चूज़े आने से कई दिन पहले पूरा कर लें, ताकि फर्श और दीवारें पूरी तरह सूख जाएँ। गीला फर्श कई दिन तक ठंडा रहता है।
- टूटी जाली, दीवारों के छेद और छत के नीचे की दरारें ठीक करें। चूहे और बिल्ली अंदर न आने दें।
पर्दे: दोहरे, नीचे से बंद
- खुली साइड पर दोहरा पर्दा लगाएँ: अंदर प्लास्टिक या तिरपाल, बाहर बोरी या तिरपाल। किनारों और नीचे की दरारें बंद करें, ताकि ठंडी हवा चूज़ों पर न लगे।
- पर्दे ऐसे लगाएँ कि वे ऊपर से खुलें (ऊपर का हिस्सा नीचे किया जाए), नीचे से उठाए नहीं। ऊपर से आने वाली ठंडी हवा चूज़ों तक पहुँचने से पहले गर्म हवा में मिल जाती है।
- बड़े शेड में अंदर एक और पर्दा या प्लास्टिक लगा कर छोटा ब्रूडिंग कमरा बना लें, इससे ईंधन का खर्च घटता है।
बिछावन (लिटर): सूखा और मोटा
- सूखी चावल की भूसी (या सूखा बुरादा) सर्दी में लगभग 4 इंच (करीब 10 सेमी) मोटी बिछाएँ। गीली, धूल वाली या फफूँद लगी भूसी बिल्कुल नहीं।
- बराबर फैलाएँ। पतली जगह से ज़मीन की ठंड ऊपर आती है।
- ब्रूडिंग वाली जगह में पहले 2–3 दिन लिटर के कुछ हिस्से पर कागज़ (अख़बार या चिक पेपर) बिछाएँ और उस पर दाना छिड़कें, ताकि चूज़ों को दाना आसानी से मिले।
पहले से गर्म करना: सिर्फ हवा नहीं, ज़मीन गर्म करें
- हीटर चूज़े आने से कम से कम 24–36 घंटे पहले चालू करें, और कड़ी ठंड या बड़े ठंडे शेड में 48 घंटे पहले।
- लक्ष्य है चूज़े आते समय लिटर (ज़मीन) का तापमान 28–30°C और चूज़ों की ऊँचाई पर हवा 32–33°C। हवा जल्दी गर्म हो जाती है, ज़मीन में बहुत ज़्यादा समय लगता है।
- ज़मीन की गर्मी हाथ लिटर में डाल कर, या इन्फ्रारेड थर्मामीटर से जाँचें। ठंडे लिटर पर खड़ा चूज़ा पैरों से गर्मी खोता है, चाहे हवा गर्म हो।
- थर्मामीटर चूज़ों की ऊँचाई पर (लिटर से 5–10 सेमी ऊपर) टाँगें, कम से कम एक हीटर के पास और एक घेरे के किनारे पर, छत के पास नहीं। मिन-मैक्स थर्मामीटर बताता है कि रात में कितनी ठंड हुई।
- ड्रिंकर चूज़े आने से कुछ घंटे पहले भर दें, ताकि पानी कमरे के तापमान पर आ जाए।
चिक गार्ड (घेरा) कैसे लगाएँ
- गत्ते, टीन या प्लास्टिक के चिक गार्ड से लगभग 45 सेमी (18 इंच) ऊँचा गोल घेरा बनाएँ। गोल, बिना कोने का, ताकि चूज़े कोने में एक-दूसरे पर चढ़ कर दब न जाएँ।
- हीटर बीच में रखें (लंबी ब्रूडिंग जगह में एक तरफ), ताकि एक गर्म हिस्सा और एक थोड़ा ठंडा हिस्सा बने। चूज़े खुद आराम की जगह चुन लेते हैं।
- फीडर और ड्रिंकर हीटर और गार्ड के बीच गोल लाइन में या बारी-बारी से रखें, ठीक हीटर के नीचे नहीं और गार्ड से सटा कर नहीं। चूज़े को दाना-पानी के लिए लगभग 1 मीटर से ज़्यादा न चलना पड़े।
- ब्रूडिंग शेड के एक हिस्से (अक्सर बीच के एक-तिहाई) में शुरू करें और चूज़ों के बढ़ने के साथ जगह बढ़ाएँ। नीचे जगह वाली तालिका देखें।
2. सर्दी की ब्रूडिंग के लिए हीटर और गैस से बचाव
जो भी हीटर हो, गर्मी पूरे घेरे में बराबर होनी चाहिए और रात के सबसे ठंडे घंटों में भी चलती रहनी चाहिए। भारतीय ब्रॉयलर फार्म में ये आम तरीके हैं:
| हीटर | फायदे | किस बात का ध्यान |
|---|---|---|
| गैस ब्रूडर (LPG) | तेज़ और बराबर गर्मी; ऊपर-नीचे करना आसान; साफ | पाइप और रेगुलेटर से गैस लीक, रात में सिलेंडर खत्म होना, शेड की हवा में CO और नमी; थोड़ी ताज़ा हवा ज़रूरी |
| अंगीठी / सिगड़ी (कोयला या लकड़ी, खुली) | सस्ती, आसानी से मिलती है | कार्बन मोनोऑक्साइड (CO) और धुएँ का सबसे ज़्यादा खतरा, गर्मी बराबर नहीं, पर्दे और लिटर के पास आग का खतरा, रात में बार-बार कोयला डालना |
| बुखारी (बंद चूल्हा, पाइप वाली चिमनी) | सस्ता ईंधन; धुआँ पाइप से बाहर; बड़ी जगह गर्म करती है | पाइप के जोड़ टाइट हों और चिमनी पूरी बाहर जाए; पाइप बहुत गर्म होता है, पर्दे और लिटर से दूर रखें |
| बिजली (बल्ब, इन्फ्रारेड लैंप, हीटर) | धुआँ या CO नहीं, कंट्रोल आसान | रात में बिजली कटना, ज़्यादा बिल, कड़ी ठंड में सिर्फ बल्ब अक्सर कम पड़ते हैं; बैकअप ज़रूरी |
- अंगीठी, बुखारी या गैस ब्रूडर चलते समय शेड को कभी पूरी तरह बंद न करें। थोड़ी ताज़ा हवा हमेशा आती रहे।
- खुली अंगीठी से बेहतर है बुखारी, जिसकी चिमनी का पाइप बाहर जाए। अंगीठी इस्तेमाल करें तो उसे बाहर सुलगाएँ, धुआँ बंद होने के बाद ही अंदर लाएँ, और पर्दों से दूर रखें।
- चूज़ों में लक्षण: सुस्ती, कमज़ोरी, मुँह खोल कर साँस, हीटर के पास बिना किसी और कारण अचानक मौत। इंसानों में: सिरदर्द, चक्कर, जी मिचलाना। शेड में ऐसा लगे तो पर्दे खोलें और तुरंत बाहर निकलें।
- कोयले या लकड़ी का हीटर जलते हुए बंद शेड में कोई न सोए।
- ब्रूडिंग वाली जगह में सस्ता CO अलार्म लगाना फायदे का सौदा है; CO लगभग 10 ppm से नीचे रखें।
- गैस पाइप और जोड़ साबुन वाले पानी से जाँचें, आग से कभी नहीं। एक भरा सिलेंडर तैयार रखें, और दरवाज़े के पास अग्निशामक या रेत की बाल्टी रखें।
बिजली कटने की तैयारी: बिजली वाली ब्रूडिंग के लिए जनरेटर या इन्वर्टर रखें, या गैस/बुखारी का बैकअप हीटर। पहले हफ्ते की एक ठंडी रात बिना गर्मी के सारी मेहनत बर्बाद कर सकती है।
3. चूज़े आने पर: पहले 24 घंटे
चूज़े आते समय
- डिब्बे खोलने से पहले देख लें कि शेड गर्म है: ज़मीन 28–30°C, चूज़ों की ऊँचाई पर हवा 32–33°C।
- चूज़े गिनें और क्वालिटी देखें: फुर्तीले, चमकदार आँखें, सूखी और ठीक भरी नाभि, लाल घुटने नहीं। हैचरी, नस्ल, बैच, चूज़े का वज़न और हैचरी में लगे टीके लिख लें।
- कुछ डिब्बों के चूज़े तौल कर एक दिन वाला औसत वज़न जान लें। 7वें दिन इसकी ज़रूरत पड़ेगी।
- जल्दी उतारें और चूज़ों को आराम से दाना-पानी के पास रखें। डिब्बे ठंडी गाड़ी में या धूप में रखे न छोड़ें।
पहला पानी
- पानी साफ और गुनगुना (लगभग 20–25°C) हो, टंकी का बर्फ जैसा ठंडा कभी नहीं, और गर्म भी नहीं।
- गुड़, चीनी या नमक का पानी न दें: चीनी आँत के बुरे बैक्टीरिया को बढ़ाती है, जिससे बीट पतली होती है और योक सैक इन्फेक्शन हो सकता है। उसकी जगह Easy Brood दें (नीचे दिन 1 से 4 का प्लान देखें)।
- कुछ चूज़ों की चोंच पानी में डुबोएँ, ताकि उन्हें ड्रिंकर का पता चले। बाकी उनके पीछे आ जाते हैं।
- निप्पल लाइन हो तो पहले दिनों में निप्पल चूज़े की आँख की ऊँचाई पर रखें और देखें कि हर निप्पल पर पानी की बूँद लटक रही हो।
पहला दाना
- शुरू से अच्छी क्वालिटी का प्री-स्टार्टर क्रम्बल दें। कागज़ पर छिड़कें और चिक ट्रे भरें, ताकि जहाँ चूज़े चलें वहाँ दाना हो।
- पहले दिनों में थोड़ा-थोड़ा, बार-बार दाना डालें, ताकि दाना ताज़ा रहे और दाना डालने की आवाज़ से चूज़े आएँ।
पोटा (क्रॉप) भरने की जाँच
यह सबसे आसान टेस्ट है कि आपकी ब्रूडिंग ठीक चल रही है या नहीं। घेरे के अलग-अलग हिस्सों से 10–20 चूज़े उठाएँ और गर्दन के नीचे की थैली (पोटा) को हल्के से छू कर देखें।
- चूज़े रखने के लगभग 8 घंटे बाद: कम से कम 80% चूज़ों का पोटा भरा और नरम हो, दाना और पानी दोनों के साथ।
- 24 घंटे पर: 95% से ज़्यादा।
- सख्त पोटा (सिर्फ सूखा दाना) मतलब चूज़ा पानी कम पी रहा है। खाली पोटा मतलब उसे दाना-पानी नहीं मिला, या ठंड से हिल नहीं रहा। तुरंत तापमान, पानी और फीडर की जगह जाँचें।
दिन 1 से 4 का स्टार्ट-अप प्लान: Easy Brood + Alceau
यह IMN Pyrophos सर्दी 2026 शेड्यूल का पहला हिस्सा है। मात्रा प्रति 1000 चूज़े है। “पहला पानी” सुबह का पानी है; “अगला पानी” वह है जो पहला पानी खत्म होने के बाद दें।
| दिन | पहला पानी | अगला पानी |
|---|---|---|
| दिन 1 | Easy Brood 70 ग्राम, चूज़े आते ही ड्रिंकर में तैयार | Vitaden H 30 ml |
| दिन 2 | Easy Brood 70 ग्राम | Alceau 15 ग्राम |
| दिन 3 | Pyrocal B 40 ml | Alceau 15 ग्राम |
| दिन 4 | ND-IB टीका (टीके के पानी में और कुछ नहीं) | Alceau 15 ग्राम |
घोल हर बार ताज़ा बनाएँ और उतना ही दें जितना चूज़े खत्म कर लें। टीके के पानी में कोई दवा या सप्लीमेंट कभी न मिलाएँ। दिन 5 से पूरा 42 दिन का सर्दी शेड्यूल मानें।
पहले 3 दिन · गुड़ के घोल की जगह
Easy Brood
चूज़ों का स्टार्ट-अप घोल: इलेक्ट्रोलाइट, ऑस्मोलाइट, ग्लूकोज़ (ऊर्जा), विटामिन C और B, बीटेन, ग्लाइसीन और प्रोबायोटिक। सफर का तनाव और पानी की कमी घटाता है, नाभि जल्दी सूखने में मदद करता है, योक सैक इन्फेक्शन और शुरुआती मौत का खतरा कम करता है। गुड़, चीनी या नमक के घोल की ज़रूरत नहीं। एंटीबायोटिक मुक्त। 250 g पैक ₹295।
मात्रा: पहले 72 घंटे पीने के पानी में 3–4 ग्राम प्रति लीटर, यानी 50–70 ग्राम प्रति 1000 चूज़े प्रति दिन। चूज़े आने से पहले घोल बना कर रखें।
500 g ₹565MRP ₹898
हर्बल एंटीमाइक्रोबियल · बेस्टसेलर
Alceau
प्याज़, लहसुन, तुलसी और दालचीनी के एक्सट्रैक्ट से बना हर्बल फार्मूला। ब्रूडिंग में शुरुआती चूज़ा मृत्यु (दिन 2–7) से बचाव, योक (ज़र्दी) घुलने में मदद, और CRD जैसे साँस के इन्फेक्शन व बैक्टीरियल इन्फेक्शन से होने वाली मौतें कम करने में सहायक। 250 g पैक ₹395।
मात्रा: IMN सर्दी शेड्यूल में दिन 2, 3 और 4 को अगले पानी में 15 ग्राम प्रति 1000 चूज़े (और दिन 21 को 100 ग्राम प्रति 1000 पक्षी); मध्यम इन्फेक्शन में 1 ग्राम प्रति 8 किलो वज़न या 1 ग्राम प्रति लीटर पानी; दाने में 1 किलो प्रति टन।
500 g ₹741MRP ₹1,190
प्रोडक्ट की पूरी जानकारी: Easy Brood · Alceau।
4. दिन के हिसाब से ब्रूडिंग तापमान चार्ट (दिन 1 से 21)
ये चूज़ों के आराम वाली जगह पर चूज़ों की ऊँचाई पर हवा का तापमान है (लिटर से 5–10 सेमी ऊपर)। पहले दिनों में लिटर 28–30°C रखें। तापमान धीरे-धीरे घटाएँ; एक दिन में 3–4°C कभी न गिराएँ। अलग नस्ल और हैचरी के चार्ट थोड़े अलग होते हैं, जहाँ फर्क हो वहाँ अपनी हैचरी या नस्ल की गाइड मानें, और हमेशा चूज़ों को खुद देखें।
| दिन | चूज़ों के पास °C | °F (लगभग) | ध्यान दें |
|---|---|---|---|
| दिन 1 | 32–33 | 90–91 | चूज़े आने से पहले ज़मीन 28–30°C; 8 घंटे पर पोटा जाँच |
| दिन 2 | 32–33 | 90–91 | 24 घंटे पर पोटा जाँच; रात में नज़र |
| दिन 3 | 32–33 | 90–91 | गंदा कागज़ हटाना शुरू करें |
| दिन 4 | 31–32 | 88–90 | घेरा पहली बार बड़ा करें |
| दिन 5 | 31–32 | 88–90 | |
| दिन 6 | 30–31 | 86–88 | |
| दिन 7 | 30–31 | 86–88 | चूज़े तौलें: एक दिन वाले वज़न का 4.5–5 गुना |
| दिन 8 | 29–30 | 84–86 | घेरा फिर बड़ा करें |
| दिन 9 | 29–30 | 84–86 | |
| दिन 10 | 29 | 84 | हवा धीरे-धीरे बढ़ाएँ |
| दिन 11 | 28–29 | 82–84 | |
| दिन 12 | 28–29 | 82–84 | |
| दिन 13 | 28 | 82 | |
| दिन 14 | 28 | 82 | फिर से तौलें; ज़्यादातर चिक गार्ड हटा सकते हैं |
| दिन 15–16 | 27–28 | 81–82 | ठंडी रातों के लिए गर्मी तैयार रखें |
| दिन 17–18 | 27 | 81 | |
| दिन 19–20 | 26–27 | 79–81 | |
| दिन 21 | 26 | 79 | इसके बाद पक्षी बढ़ने के साथ 21–26°C |
गैस ब्रूडर के ठीक नीचे या बुखारी के पास तापमान इस तालिका से ज़्यादा होगा, और घेरे के किनारे पर कम। यह ठीक है, जब तक चूज़े गर्मी के चारों ओर चौड़े, बराबर घेरे में आराम कर रहे हों।
5. थर्मामीटर से ज़्यादा चूज़ों को पढ़ें
थर्मामीटर हवा बताता है; चूज़े बताते हैं कि उन्हें कैसा लग रहा है। अंदर जाने से पहले दरवाज़े से चुपचाप उन्हें देखें।
| क्या दिखे | मतलब | क्या करें |
|---|---|---|
| चूज़े हीटर के नीचे या पास कस कर झुंड बनाए, ज़ोर-ज़ोर से चीं-चीं | ठंड ज़्यादा | गर्मी बढ़ाएँ, ब्रूडर थोड़ा नीचे करें, ठंडी हवा और ठंडी ज़मीन जाँचें |
| चूज़े हीटर से दूर, गार्ड के पास, मुँह खोल कर साँस, पंख लटके | गर्मी ज़्यादा | गर्मी कम करें या ब्रूडर ऊपर करें; थोड़ी हवा बढ़ाएँ |
| चूज़े घेरे की एक तरफ इकट्ठे | दूसरी तरफ से ठंडी हवा, या गर्मी/रोशनी बराबर नहीं | दरार ढूँढ कर बंद करें; पर्दे और हीटर की जगह देखें |
| चूज़े बराबर फैले, कुछ खा रहे, कुछ पी रहे, कुछ आराम कर रहे; हल्की चीं-चीं | आराम में | ऐसे ही बनाए रखें |
| कोयले या गैस हीटर के पास चूज़े सुस्त, लेटे हुए, मुँह खोल कर साँस | गैस (CO) की दिक्कत हो सकती है | तुरंत हवा दें, हीटर और चिमनी जाँचें |
दो और तरीके: चूज़े के पैर अपने गाल या गर्दन से लगाएँ; ठंडे पैर मतलब ठंडी ज़मीन। और दिन की सबसे ज़रूरी जाँच रात 2–4 बजे की है, सबसे ठंडा समय, जब हीटर धीमे पड़ जाते हैं और ज़्यादातर ठंड इसी समय लगती है।
6. जगह (डेंसिटी) और धीरे-धीरे घेरा बढ़ाना
चूज़ों को छोटी जगह में शुरू करने से ईंधन बचता है और चूज़े गर्मी, दाना और पानी के पास रहते हैं। पर समय पर जगह नहीं बढ़ाई तो भीड़ होती है, लिटर गीला होता है और बढ़त रुकती है। खुली साइड वाले शेड के लिए सामान्य अंदाज़ा:
| उम्र | प्रति चूज़ा जगह (लगभग) | प्रति वर्ग फुट चूज़े (लगभग) | क्या करें |
|---|---|---|---|
| दिन 1–3 | 0.3–0.35 वर्ग फुट | 3–3.5 | गर्मी के चारों ओर छोटा घेरा |
| दिन 4–7 | 0.4–0.5 वर्ग फुट | 2–2.5 | हर 2–3 दिन में गार्ड बड़ा करें |
| दिन 8–14 | 0.6–0.75 वर्ग फुट | 1.3–1.7 | गार्ड धीरे-धीरे हटाएँ, शेड का और हिस्सा खोलें |
| दिन 15–21 | 0.8–1 वर्ग फुट | 1–1.25 | लगभग 18–21 दिन तक पूरा शेड |
- घेरा दिन की गर्मी में बड़ा करें, शाम को नहीं।
- शेड का नया हिस्सा खोलने से पहले उसे और उसका लिटर गर्म कर लें, ताकि चूज़े ठंडी ज़मीन पर न जाएँ।
- गार्ड के साथ फीडर और ड्रिंकर भी बाहर की ओर खिसकाएँ, ताकि वे बराबर फैले रहें।
- आखिरी डेंसिटी शेड, मौसम और लक्ष्य वज़न पर निर्भर है। 2–2.5 किलो के ब्रॉयलर के लिए कई फार्म लगभग 1 वर्ग फुट प्रति पक्षी रखते हैं; अपने शेड के लिए इंटीग्रेटर या डॉक्टर की सलाह मानें।
7. फीडर और ड्रिंकर की संख्या
| सामान | दिन 1–7 (लगभग) | दिन 8–14 (लगभग) |
|---|---|---|
| चिक फीडर ट्रे / कागज़ | 100 चूज़ों पर 1 ट्रे, साथ में 2–3 दिन कागज़ पर दाना | धीरे-धीरे ट्यूब या लंबे फीडर पर लाएँ |
| ट्यूब/गोल फीडर | दिन 4–5 से ट्रे के पास रखना शुरू करें | लगभग 30–40 पक्षी पर 1 (साइज़ के हिसाब से) |
| जार/फाउंट ड्रिंकर (3–5 लीटर) | 50–75 चूज़ों पर 1 | पक्षी बढ़ने पर बेल ड्रिंकर जोड़ें |
| निप्पल ड्रिंकर | लगभग 10–15 चूज़ों पर 1 निप्पल, आँख की ऊँचाई पर | लाइन ऊपर करें ताकि पक्षी थोड़ा ऊपर गर्दन करके पिएँ |
- चूज़े बढ़ने के साथ ड्रिंकर का किनारा उनकी पीठ की ऊँचाई पर रखें, ताकि पानी लिटर में न गिरे।
- जार ड्रिंकर रोज़ साफ करें। दाना और पानी के बर्तन कभी खाली न रहें।
- ड्रिंकर के आसपास का गीला लिटर रोज़ सुबह हटाएँ और सूखी भूसी डालें। ज़्यादा जानकारी: सर्दी में गीला लिटर और पतली बीट।
8. ब्रूडिंग में आँत की सेहत
अंडे से निकलते समय चूज़े की आँत में अच्छे बैक्टीरिया लगभग नहीं होते। पहले दिन तय करते हैं कि वहाँ कौन से बैक्टीरिया बसेंगे। अच्छी ब्रूडिंग (गर्मी, जल्दी दाना और साफ पानी) इसकी नींव है। इसके साथ कई किसान पहले दिनों में प्रोबायोटिक देते हैं, ताकि आँत में अच्छे बैक्टीरिया बसें, ज़र्दी पचने में मदद मिले और बीट सामान्य रहे।
आँत की सेहत · बेस्टसेलर
Remipro
प्रोबायोटिक, प्रीबायोटिक (MOS) और Saccharomyces, साथ में बीटेन, मेथियोनीन और विटामिन C। आँत के अच्छे बैक्टीरिया लौटाता है, पतली बीट घटाता है, पाचन और FCR सुधारता है, कॉक्सीडियोसिस से उबरने में मदद करता है और भूरी/कॉफी रंग की बीट ठीक करता है।
मात्रा: रोज़ की आँत सेहत के लिए 1 ग्राम प्रति 8 किलो वज़न या 1 ग्राम प्रति लीटर पानी; पतली बीट और इन्फेक्शन में 1 ग्राम प्रति 5 किलो वज़न या 2 ग्राम प्रति लीटर; ब्रूडिंग में 1 ग्राम प्रति 100 चूज़े।
500 g ₹626MRP ₹950
प्रोडक्ट की जानकारी: Remipro। प्रोबायोटिक गर्मी या साफ पानी की जगह नहीं लेता; चूज़ों को ठंड लग रही हो तो पहले तापमान ठीक करें।
9. कम से कम हवा बनाम गर्मी बचाना
सर्दी में यही सबसे मुश्किल संतुलन है। किसान गर्मी बचाने के लिए सब बंद कर देते हैं, पर चूज़ों को ऑक्सीजन चाहिए, और शेड से नमी, अमोनिया और हीटर की गैसें बाहर निकलनी चाहिए। बंद, सीलन भरा शेड CRD, E. coli और इंफेक्शियस ब्रोंकाइटिस की बड़ी वजह है। मुर्गियों में इंफेक्शियस ब्रोंकाइटिस (IB) के बारे में पढ़ें, जो कम हवा वाले सर्दी के शेड में तेज़ी से फैलता है।
- कम से कम हवा (मिनिमम वेंटिलेशन) का मतलब है हवा का थोड़ा-थोड़ा, नियमित बदलना, शेड को पूरा खोलना नहीं। सबसे ठंडी रात में भी कुछ ताज़ा हवा आती रहे।
- पर्दे वाले शेड में हवा से उल्टी तरफ पर्दे का ऊपरी हिस्सा कुछ इंच नीचे करें, खासकर दोपहर की गर्मी में। पर्दे नीचे से कभी न उठाएँ।
- एग्ज़ॉस्ट पंखे हों तो उन्हें लगातार नहीं, टाइमर पर चलाएँ (जैसे हर कुछ मिनट में थोड़ी देर)।
- नाक से जाँच: अंदर जाते ही अमोनिया की गंध आए या आँखें जलें, तो हवा कम है। अमोनिया लगभग 10 ppm से नीचे रखें। सुबह पर्दों के अंदर ज़्यादा पानी की बूँदें भी कम हवा का संकेत हैं।
- आने वाली ठंडी हवा चूज़ों के ऊपर से जाए, उन पर नहीं। चूज़ों की ऊँचाई पर ठंडी हवा उन्हें ठिठुरा देती है, चाहे थर्मामीटर ठीक दिखे।
- दिन 10 के बाद हवा धीरे-धीरे बढ़ाएँ, क्योंकि पक्षी ज़्यादा गर्मी और नमी बनाते हैं।
सर्दी के पूरे प्रबंधन के लिए देखें: पोल्ट्री फार्मिंग में सर्दी का प्रबंधन।
10. नमी (ह्यूमिडिटी)
- पहले दिनों में लगभग 60–70% नमी चूज़ों को सूखने से बचाती है। पहले हफ्ते के बाद लगभग 50–65% ठीक है।
- बहुत सूखा (कोयले और बिजली के हीटर में आम): चूज़ों में पानी की कमी, धूल, शुरुआती मौतें और गुदा पर बीट चिपकना बढ़ता है। हीटर के पास चूज़ों की पहुँच से दूर खुले बर्तन में पानी रखना, या रास्ते पर हल्का पानी छिड़कना मदद करता है।
- बहुत गीला (बंद शेड में आम): गीला लिटर, अमोनिया, ठंडी ज़मीन, पैर और आँत की दिक्कत। मिनिमम वेंटिलेशन बढ़ाएँ और गीला लिटर हटाएँ।
- चूज़ों की ऊँचाई पर टँगा सस्ता डिजिटल थर्मो-हाइग्रोमीटर तापमान और नमी दोनों बताता है।
11. पहले दो हफ्ते का रोशनी प्रोग्राम
- दिन 1–7: लगभग लगातार रोशनी (करीब 23 घंटे रोशनी, 1 घंटा अँधेरा), चूज़ों की ऊँचाई पर तेज़ और बराबर रोशनी, ताकि दाना-पानी आसानी से मिले। 1 घंटे का अँधेरा उन्हें बिजली कटने पर घबराने से बचाता है।
- दिन 7–8 से: धीरे-धीरे अँधेरे का समय बढ़ाएँ (कदम-कदम पर रात में लगभग 4–6 घंटे अँधेरा तक), और रोशनी कुछ कम करें। अँधेरा पैरों की सेहत, इम्युनिटी और बराबर बढ़त में मदद करता है।
- ब्रूडिंग जगह में अँधेरे कोने और गहरी छाया न हो; चूज़े रोशनी वाली जगह पर भीड़ लगाते हैं।
- अगर आपकी नस्ल की गाइड या इंटीग्रेटर दूसरा प्रोग्राम बताए, तो वही मानें।
12. दिन 7 और दिन 14 पर वज़न
- दिन 7 पर घेरे के अलग-अलग हिस्सों से कम से कम 50–100 चूज़े (या फ्लॉक के लगभग 1–2%) तौलें।
- लक्ष्य: एक दिन वाले वज़न का लगभग 4.5–5 गुना। 40 ग्राम का चूज़ा 7वें दिन लगभग 180–200 ग्राम का होना चाहिए।
- औसत कम हो तो पहले ब्रूडिंग तापमान (खासकर रात का), पानी तक पहुँच, कागज़ पर दाना, फीडर की जगह और चूज़ों की क्वालिटी देखें।
- बराबरी भी देखें। बहुत छोटे चूज़े ज़्यादा हों, तो उन्हें हीटर के पास अलग घेरे में रखें, ज़्यादा दाना-पानी के साथ।
- दिन 14 पर फिर तौलें और अपनी नस्ल के वज़न चार्ट से मिलाएँ (हैचरी या इंटीग्रेटर से मिल जाता है)।
- पहले हफ्ते की मौतें आमतौर पर 1% से कम रहनी चाहिए। ज़्यादा हों तो डॉक्टर को बुलाएँ और मरे चूज़े पोस्टमार्टम के लिए भेजें।
13. ठंड में इम्युनिटी और टीकाकरण
ठंड, सफर, भीड़ और पहले टीके, सब छोटे चूज़ों पर तनाव डालते हैं। टीकाकरण का शेड्यूल अपनी हैचरी या डॉक्टर से लें (यह इलाके और इंटीग्रेटर के हिसाब से बदलता है)। टीका सुबह साफ, ठंडे, बिना सैनिटाइज़र वाले पानी में दें। हमारा सर्दी में ब्रॉयलर दवा शेड्यूल बताता है कि हर कदम कब आता है। टीके के आसपास और कड़ी ठंड के तनाव में एंटीऑक्सीडेंट इम्युनिटी सहारा मदद कर सकता है:
इम्यूनिटी बूस्टर
Nexamune
विटामिन E, सेलेनियम, आँवला, तुलसी और अश्वगंधा एक्सट्रैक्ट, विटामिन C, विटामिन D और नियासिन: इम्यूनिटी को सहारा देने वाली एंटीऑक्सीडेंट ढाल। IB, ND, गम्बोरो, IBH और LPAI जैसी बीमारियों में इम्यून सिस्टम को सहारा, CRD और साँस की दूसरी दिक्कतों की गंभीरता कम करता है, और टीका फेल होने की संभावना घटाने में मदद करता है।
मात्रा: इम्यूनिटी और तनाव के लिए 1 ml प्रति लीटर पानी या 15 ml प्रति 100 पक्षी; टीके से पहले और बाद 2 ml प्रति लीटर पानी; वायरल बीमारी फैलने पर 25–30 ml प्रति 100 पक्षी।
1 L ₹644MRP ₹1,190
प्रोडक्ट की जानकारी: Nexamune। सप्लीमेंट लेबल के अनुसार ताज़े पानी में दें, और कोई दवा या एंटीबायोटिक अंदाज़े से न दें; पहले डॉक्टर से पूछें।
14. दिन 1 से दिन 14 की रोज़ की चेकलिस्ट
| दिन | चूज़ों के पास तापमान | मुख्य काम |
|---|---|---|
| चूज़े आने से पहले | ज़मीन 28–30°C, हवा 32–33°C | 24–48 घंटे पहले गर्म करें, 4 इंच लिटर, दोहरे पर्दे, घेरा तैयार, ड्रिंकर भरे, CO और गैस जाँच, बैकअप गर्मी तैयार |
| दिन 1 | 32–33°C | चूज़े गिनें और जाँचें, कुछ तौलें, चूज़े आते ही Easy Brood 70 ग्राम/1000, फिर Vitaden H 30 ml, कागज़ पर दाना, चोंच डुबोएँ, 8 घंटे पर पोटा जाँच, रात की जाँच |
| दिन 2 | 32–33°C | Easy Brood 70 ग्राम, फिर Alceau 15 ग्राम, 24 घंटे पर पोटा जाँच (95% से ज़्यादा), कमज़ोर चूज़े अलग करें, बार-बार दाना, रात 2–4 बजे व्यवहार देखें |
| दिन 3 | 32–33°C | Pyrocal B 40 ml, फिर Alceau 15 ग्राम, गंदा कागज़ हटाएँ, ड्रिंकर साफ करें, मौतें लिखें, नमी जाँचें |
| दिन 4 | 31–32°C | सुबह के पानी में ND-IB टीका (उसमें और कुछ नहीं), अगले पानी में Alceau 15 ग्राम, दिन में पहली बार घेरा बड़ा करें, कुछ ट्यूब फीडर रखें, गीला लिटर हटाएँ |
| दिन 5 | 31–32°C | नाभि और गुदा पर चिपकी बीट देखें, बीट का रंग देखें, टीका हो तो शेड्यूल से दें |
| दिन 6 | 30–31°C | ड्रिंकर की ऊँचाई ठीक करें, सुबह अमोनिया जाँचें, ईंधन और गैस का स्टॉक देखें |
| दिन 7 | 30–31°C | 50–100 चूज़े तौलें (लक्ष्य 4.5–5 गुना), पहला अँधेरा समय, पहले हफ्ते की मौतें देखें |
| दिन 8 | 29–30°C | घेरा बड़ा करें, नई जगह पहले गर्म करें, फीडर-ड्रिंकर बाहर खिसकाएँ |
| दिन 9 | 29–30°C | लिटर हल्का पलटें, जमे हुए टुकड़े हटाएँ, मिन-मैक्स थर्मामीटर पर रात का तापमान देखें |
| दिन 10 | 29°C | मिनिमम वेंटिलेशन थोड़ा बढ़ाएँ, चूज़ों की ऊँचाई पर ठंडी हवा जाँचें |
| दिन 11 | 28–29°C | कुछ चिक ट्रे हटाएँ, ट्यूब फीडर पर ज़्यादा भरोसा; बराबरी देखें |
| दिन 12 | 28–29°C | टीका हो तो शेड्यूल से दें; पानी की लाइन साफ करें |
| दिन 13 | 28°C | शेड का और हिस्सा खोलें, रात में पर्दे बंद, साँस की आवाज़ पर नज़र |
| दिन 14 | 28°C | फिर तौलें, नस्ल के चार्ट से मिलाएँ, बचे गार्ड हटाएँ, अगले दो हफ्ते की योजना |
हर दिन: सुबह मौतें गिनें और लिखें, दाना-पानी भरें, गीला लिटर हटाएँ; दोपहर में धूप हो तो पर्दा ऊपर से थोड़ा खोलें; शाम को पर्दे बंद, हीटर, गैस और बैकअप जाँचें; रात 2–4 बजे चूज़ों का फैलाव, तापमान और धुआँ/गैस देखें।
15. सर्दी की ब्रूडिंग में आम गलतियाँ
- चूज़े आने पर ही हीटर चालू करना। हवा एक घंटे में गर्म हो जाती है, ज़मीन को एक दिन या ज़्यादा चाहिए।
- छत के पास तापमान नापना, चूज़ों की ऊँचाई पर नहीं, और सिर्फ हवा देखना, लिटर नहीं।
- ठंड के डर से शेड पूरा बंद कर देना, जिससे अमोनिया, गैस, गीला लिटर और साँस की बीमारी।
- बंद शेड में खुली अंगीठी, या बुखारी के पाइप से धुआँ रिसना।
- पहले दिन टंकी का बर्फ जैसा ठंडा पानी।
- कम ड्रिंकर और फीडर, या उन्हें गर्मी से दूर रखना।
- रात में जाँच न करना। ज़्यादातर ठंड आधी रात से सुबह के बीच लगती है।
- घेरा बहुत जल्दी बड़ा करना या गर्मी जल्दी घटाना, या ठंडी शाम में करना।
- ब्रूडिंग जगह में चौकोर कोने, जहाँ चूज़े एक-दूसरे पर चढ़ कर दब जाते हैं।
- दिन 7 पर वज़न न करना, जिससे खराब शुरुआत बैच के आखिर में पता चलती है।
- शुरुआती मौतों में ब्रूडिंग ठीक करने और डॉक्टर बुलाने की जगह अंदाज़े से एंटीबायोटिक देना।
16. डॉक्टर को कब बुलाएँ
अक्सर पूछे जाने वाले सवाल
सर्दी में चूज़े आने से कितने घंटे पहले ब्रूडर चालू करें?
कम से कम 24–36 घंटे पहले, और कड़ी ठंड या बड़े शेड में 48 घंटे पहले तक। चूज़ों के डिब्बे खोलने से पहले लिटर 28–30°C और चूज़ों की ऊँचाई पर हवा 32–33°C हो।
पहले दिन ब्रॉयलर चूज़ों को कितना तापमान चाहिए?
पहले 3 दिन चूज़ों की ऊँचाई पर लगभग 32–33°C (90–91°F), फिर धीरे-धीरे घटा कर दिन 7 तक लगभग 30–31°C और दिन 14 तक 28°C। हमेशा चूज़ों का फैलाव देख कर पक्का करें।
क्या ब्रूडिंग में अंगीठी सुरक्षित है?
खुली अंगीठी से कार्बन मोनोऑक्साइड और धुआँ निकलता है, यह सबसे खतरनाक तरीका है। मजबूरी हो तो बाहर सुलगाएँ, धुआँ बंद होने पर ही अंदर लाएँ, पर्दों से दूर रखें, और शेड कभी पूरा बंद न करें। चिमनी वाली बुखारी या गैस ब्रूडर ज़्यादा सुरक्षित है।
क्या सर्दी में रात को सारे पर्दे बंद कर दें?
ठंडी हवा रोकने के लिए बंद करें, पर हवा से उल्टी तरफ ऊपर थोड़ी जगह खुली छोड़ें ताकि कुछ ताज़ा हवा आए। पूरा बंद शेड अमोनिया, नमी और हीटर की गैसें जमा करता है।
7वें दिन ब्रॉयलर चूज़े का वज़न कितना होना चाहिए?
एक दिन वाले वज़न का लगभग 4.5–5 गुना, यानी 40 ग्राम के चूज़े का लगभग 180–200 ग्राम। अपनी नस्ल के वज़न चार्ट से मिलाएँ।
क्या चूज़ों को चीनी या ग्लूकोज़ का पानी दे सकते हैं?
गुड़, चीनी और नमक का पानी न दें। चीनी आँत के बुरे बैक्टीरिया को बढ़ाती है, जिससे बीट पतली और योक सैक इन्फेक्शन हो सकता है। दिन 1 और 2 को Easy Brood 70 ग्राम प्रति 1000 चूज़े दें, और दिन 2, 3 और 4 को अगले पानी में Alceau 15 ग्राम प्रति 1000 चूज़े (दिन 1 से 4 का प्लान देखें)। उसके बाद सादा, साफ, गुनगुना पानी दें।
चिक गार्ड कब हटाएँ?
दिन 4 से हर 2–3 दिन में घेरा बड़ा करें, और मौसम के हिसाब से लगभग दिन 10 से 14 के बीच धीरे-धीरे हटाएँ। तीसरे हफ्ते में भी ठंडी रातों के लिए गर्मी तैयार रखें।
सर्दी ब्रॉयलर सीरीज़ की बाकी गाइड
ये भी काम के: आज का ब्रॉयलर रेट · पोल्ट्री लागत और मुनाफा कैलकुलेटर · सर्दी में गीला लिटर · IMN पोल्ट्री प्रोडक्ट
यह सामान्य जानकारी है। अपनी नस्ल की गाइड और हैचरी की सलाह भी मानें, और कोई भी दवा देने से पहले डॉक्टर से पूछें।
Sardi me Broiler Brooding Guide: Din 1 se Din 14 (Temperature, Heater, Hawa)
Sardi me pehle 14 din hi tay karte hain ki poora broiler batch kaisa niklega. Ek din ka chooza khud ko garam nahi rakh paata. Pehle hafte wo poori tarah aapki di hui garmi par nirbhar hai, aur 7ve din tak uska wazan ek din wale wazan ka lagbhag 4.5–5 guna ho jaana chahiye. Agar is samay thand lag gayi, to chooza apni zardi (yolk) theek se nahi pacha paata, kam khata-peeta hai, flock barabar nahi badhta, FCR bigadta hai aur aage chal kar ascites aur saans ki beemari ka khatra badhta hai. Kamai ya nuksan brooding me hi tay ho jaata hai.
Is guide me chooze aane se pehle shed ki taiyari se lekar 14ve din tak sab kuch hai: din ke hisaab se temperature chart, heater aur gas se bachav, pehle 24 ghante, choozon ka vyavhaar kaise padhein, jagah, hawa, nami, roshni, aur roz ki checklist jise aap print karke shed me taang sakte hain.
1. Shed ki taiyari: chooze aane se 24–48 ghante pehle
Sardi ki brooding me zyadatar gadbad chooze aane se pehle hi shuru ho jaati hai. Agar choozon ka dibba thandi zameen par khola gaya, to pehle kuch ghanton me hi nuksan ho jaata hai.
Saaf, sookha aur keetanu-rahit shed
- Shed, feeder aur drinker ki dhulai aur disinfectant chhidkaav chooze aane se kai din pehle poora kar lijiye, taaki farsh aur deewarein poori tarah sookh jaayein. Geela farsh kai din tak thanda rehta hai.
- Tooti jaali, deewaron ke chhed aur chhat ke neeche ki daraarein theek kijiye. Choohe aur billi andar na aane dein.
Parde: double, neeche se band
- Khuli side par double parda lagaiye: andar plastic ya tirpal, bahar bori ya tirpal. Kinaaron aur neeche ki daraarein band kijiye, taaki thandi hawa choozon par na lage.
- Parde aise lagaiye ki wo upar se khulein (upar ka hissa neeche kiya jaaye), neeche se uthaye nahi. Upar se aane wali thandi hawa choozon tak pahunchne se pehle garam hawa me mil jaati hai.
- Bade shed me andar ek aur parda ya plastic laga kar chhota brooding kamra bana lijiye, isse fuel ka kharcha ghatta hai.
Litter: sookha aur mota
- Sookhi chawal ki bhoosi (ya sookha burada) sardi me lagbhag 4 inch (kareeb 10 cm) moti bichhaiye. Geeli, dhool wali ya phaphoond lagi bhoosi bilkul nahi.
- Barabar failaiye. Patli jagah se zameen ki thand upar aati hai.
- Brooding wali jagah me pehle 2–3 din litter ke kuch hisse par kaagaz (akhbaar ya chick paper) bichhaiye aur us par daana chhidakiye, taaki choozon ko daana aasani se mile.
Pehle se garam karna: sirf hawa nahi, zameen garam kijiye
- Heater chooze aane se kam se kam 24–36 ghante pehle chalu kijiye, aur kadi thand ya bade thande shed me 48 ghante pehle.
- Lakshya hai chooze aate samay litter (zameen) ka temperature 28–30°C aur choozon ki oonchai par hawa 32–33°C. Hawa jaldi garam ho jaati hai, zameen me bahut zyada samay lagta hai.
- Zameen ki garmi haath litter me daal kar, ya infrared thermometer se jaanchiye. Thande litter par khada chooza pairon se garmi khota hai, chahe hawa garam ho.
- Thermometer choozon ki oonchai par (litter se 5–10 cm upar) taangiye, kam se kam ek heater ke paas aur ek ghere ke kinaare par, chhat ke paas nahi. Min-max thermometer batata hai ki raat me kitni thand hui.
- Drinker chooze aane se kuch ghante pehle bhar dijiye, taaki paani kamre ke temperature par aa jaaye.
Chick guard (ghera) kaise lagayein
- Gatte, teen ya plastic ke chick guard se lagbhag 45 cm (18 inch) ooncha gol ghera banaiye. Gol, bina kone ka, taaki chooze kone me ek-doosre par chadh kar dab na jaayein.
- Heater beech me rakhiye (lambi brooding jagah me ek taraf), taaki ek garam hissa aur ek thoda thanda hissa bane. Chooze khud aaram ki jagah chun lete hain.
- Feeder aur drinker heater aur guard ke beech gol line me ya baari-baari se rakhiye, theek heater ke neeche nahi aur guard se sata kar nahi. Choozon ko daana-paani ke liye lagbhag 1 meter se zyada na chalna pade.
- Brooding shed ke ek hisse (aksar beech ke ek-tihai) me shuru kijiye aur choozon ke badhne ke saath jagah badhaiye. Neeche jagah wali table dekhiye.
2. Sardi ki brooding ke liye heater aur gas se bachav
Jo bhi heater ho, garmi poore ghere me barabar honi chahiye aur raat ke sabse thande ghanton me bhi chalti rehni chahiye. Bharat ke broiler farm me ye aam tareeke hain:
| Heater | Fayde | Kis baat ka dhyan |
|---|---|---|
| Gas brooder (LPG) | Tez aur barabar garmi; upar-neeche karna aasaan; saaf | Pipe aur regulator se gas leak, raat me cylinder khatam hona, shed ki hawa me CO aur nami; thodi taazi hawa zaroori |
| Angithi / sigdi (koyla ya lakdi, khuli) | Sasti, aasani se milti hai | Carbon monoxide (CO) aur dhuein ka sabse zyada khatra, garmi barabar nahi, parde aur litter ke paas aag ka khatra, raat me baar-baar koyla daalna |
| Bukhari (band chulha, pipe wali chimney) | Sasta fuel; dhuaan pipe se bahar; badi jagah garam karti hai | Pipe ke jod tight hon aur chimney poori bahar jaaye; pipe bahut garam hota hai, parde aur litter se door rakhiye |
| Bijli (bulb, infrared lamp, heater) | Dhuaan ya CO nahi, control aasaan | Raat me bijli katna, zyada bill, kadi thand me sirf bulb aksar kam padte hain; backup zaroori |
- Angithi, bukhari ya gas brooder chalte samay shed ko kabhi poori tarah band mat kijiye. Thodi taazi hawa hamesha aati rahe.
- Khuli angithi se behtar hai bukhari, jiski chimney ka pipe bahar jaaye. Angithi istemal karein to use bahar sulgaiye, dhuaan band hone ke baad hi andar laiye, aur pardon se door rakhiye.
- Choozon me lakshan: susti, kamzori, munh khol kar saans, heater ke paas bina kisi aur kaaran achanak maut. Insaanon me: sirdard, chakkar, ji michlana. Shed me aisa lage to parde kholiye aur turant bahar nikliye.
- Koyle ya lakdi ka heater jalte hue band shed me koi na soye.
- Brooding wali jagah me sasta CO alarm lagana fayde ka sauda hai; CO lagbhag 10 ppm se neeche rakhiye.
- Gas pipe aur jod saabun wale paani se jaanchiye, aag se kabhi nahi. Ek bhara cylinder taiyar rakhiye, aur darwaze ke paas fire extinguisher ya ret ki balti rakhiye.
Bijli katne ki taiyari: bijli wali brooding ke liye generator ya inverter rakhiye, ya gas/bukhari ka backup heater. Pehle hafte ki ek thandi raat bina garmi ke saari mehnat barbaad kar sakti hai.
3. Chooze aane par: pehle 24 ghante
Chooze aate samay
- Dibbe kholne se pehle dekh lijiye ki shed garam hai: zameen 28–30°C, choozon ki oonchai par hawa 32–33°C.
- Chooze giniye aur quality dekhiye: phurtile, chamakdaar aankhein, sookhi aur theek bhari naabhi, laal ghutne nahi. Hatchery, nasl, batch, chooze ka wazan aur hatchery me lage teeke likh lijiye.
- Kuch dibbon ke chooze taul kar ek din wala ausat wazan jaan lijiye. 7ve din iski zaroorat padegi.
- Jaldi utaariye aur choozon ko aaram se daana-paani ke paas rakhiye. Dibbe thandi gaadi me ya dhoop me rakhe mat chhodiye.
Pehla paani
- Paani saaf aur gunguna (lagbhag 20–25°C) ho, tanki ka barf jaisa thanda kabhi nahi, aur garam bhi nahi.
- Gud, cheeni ya namak ka paani mat dijiye: cheeni aant ke bure bacteria ko badhati hai, jisse beet patli hoti hai aur yolk sac infection ho sakta hai. Uski jagah Easy Brood dijiye (neeche din 1 se 4 ka plan dekhiye).
- Kuch choozon ki chonch paani me duboiye, taaki unhe drinker ka pata chale. Baaki unke peechhe aa jaate hain.
- Nipple line ho to pehle dinon me nipple chooze ki aankh ki oonchai par rakhiye aur dekhiye ki har nipple par paani ki boond latak rahi ho.
Pehla daana
- Shuru se achhi quality ka pre-starter crumble dijiye. Kaagaz par chhidakiye aur chick tray bhariye, taaki jahan chooze chalein wahan daana ho.
- Pehle dinon me thoda-thoda, baar-baar daana daaliye, taaki daana taaza rahe aur daana daalne ki awaaz se chooze aayein.
Pota (crop) bharne ki jaanch
Ye sabse aasaan test hai ki aapki brooding theek chal rahi hai ya nahi. Ghere ke alag-alag hisson se 10–20 chooze uthaiye aur gardan ke neeche ki thaili (pota) ko halke se chhoo kar dekhiye.
- Chooze rakhne ke lagbhag 8 ghante baad: kam se kam 80% choozon ka pota bhara aur naram ho, daana aur paani dono ke saath.
- 24 ghante par: 95% se zyada.
- Sakht pota (sirf sookha daana) matlab chooza paani kam pee raha hai. Khaali pota matlab use daana-paani nahi mila, ya thand se hil nahi raha. Turant temperature, paani aur feeder ki jagah jaanchiye.
Din 1 se 4 ka start-up plan: Easy Brood + Alceau
Ye IMN Pyrophos sardi 2026 schedule ka pehla hissa hai. Matra prati 1000 chooze hai. “Pehla paani” subah ka paani hai; “agla paani” wo hai jo pehla paani khatam hone ke baad dijiye.
| Din | Pehla paani | Agla paani |
|---|---|---|
| Din 1 | Easy Brood 70 g, chooze aate hi drinker me taiyar | Vitaden H 30 ml |
| Din 2 | Easy Brood 70 g | Alceau 15 g |
| Din 3 | Pyrocal B 40 ml | Alceau 15 g |
| Din 4 | ND-IB teeka (teeke ke paani me aur kuch nahi) | Alceau 15 g |
Ghol har baar taaza banaiye aur utna hi dijiye jitna chooze khatam kar lein. Teeke ke paani me koi dawa ya supplement kabhi mat milaiye. Din 5 se poora 42 din ka sardi schedule maniye.
Pehle 3 din · gud ke ghol ki jagah
Easy Brood
Choozon ka start-up ghol: electrolyte, osmolyte, glucose (urja), vitamin C aur B, betaine, glycine aur probiotic. Safar ka tanav aur paani ki kami ghatata hai, naabhi jaldi sookhne me madad karta hai, yolk sac infection aur shuruaati maut ka khatra kam karta hai. Gud, cheeni ya namak ke ghol ki zaroorat nahi. Antibiotic mukt. 250 g pack ₹295.
Matra: Pehle 72 ghante peene ke paani me 3–4 g prati litre, yaani 50–70 g prati 1000 chooze prati din. Chooze aane se pehle ghol bana kar rakhiye.
500 g ₹565MRP ₹898
Herbal antimicrobial · bestseller
Alceau
Pyaaz, lehsun, tulsi aur daalchini ke extract se bana herbal formula. Brooding me shuruaati chooza mrityu (din 2–7) se bachav, yolk (zardi) ghulne me madad, aur CRD jaise saans ke infection va bacterial infection se hone wali maut kam karne me sahayak. 250 g pack ₹395.
Matra: IMN sardi schedule me din 2, 3 aur 4 ko agle paani me 15 g prati 1000 chooze (aur din 21 ko 100 g prati 1000 pakshi); madhyam infection me 1 g prati 8 kg wazan ya 1 g prati litre paani; daane me 1 kg prati ton.
500 g ₹741MRP ₹1,190
Product ki poori jaankari: Easy Brood · Alceau.
4. Din ke hisaab se brooding temperature chart (din 1 se 21)
Ye choozon ke aaram wali jagah par choozon ki oonchai par hawa ka temperature hai (litter se 5–10 cm upar). Pehle dinon me litter 28–30°C rakhiye. Temperature dheere-dheere ghataiye; ek din me 3–4°C kabhi mat giraiye. Alag nasl aur hatchery ke chart thode alag hote hain, jahan farq ho wahan apni hatchery ya nasl ki guide maniye, aur hamesha choozon ko khud dekhiye.
| Din | Choozon ke paas °C | °F (lagbhag) | Dhyan dein |
|---|---|---|---|
| Din 1 | 32–33 | 90–91 | Chooze aane se pehle zameen 28–30°C; 8 ghante par pota jaanch |
| Din 2 | 32–33 | 90–91 | 24 ghante par pota jaanch; raat me nazar |
| Din 3 | 32–33 | 90–91 | Ganda kaagaz hatana shuru kijiye |
| Din 4 | 31–32 | 88–90 | Ghera pehli baar bada kijiye |
| Din 5 | 31–32 | 88–90 | |
| Din 6 | 30–31 | 86–88 | |
| Din 7 | 30–31 | 86–88 | Chooze tauliye: ek din wale wazan ka 4.5–5 guna |
| Din 8 | 29–30 | 84–86 | Ghera phir bada kijiye |
| Din 9 | 29–30 | 84–86 | |
| Din 10 | 29 | 84 | Hawa dheere-dheere badhaiye |
| Din 11 | 28–29 | 82–84 | |
| Din 12 | 28–29 | 82–84 | |
| Din 13 | 28 | 82 | |
| Din 14 | 28 | 82 | Phir se tauliye; zyadatar chick guard hata sakte hain |
| Din 15–16 | 27–28 | 81–82 | Thandi raaton ke liye garmi taiyar rakhiye |
| Din 17–18 | 27 | 81 | |
| Din 19–20 | 26–27 | 79–81 | |
| Din 21 | 26 | 79 | Iske baad pakshi badhne ke saath 21–26°C |
Gas brooder ke theek neeche ya bukhari ke paas temperature is table se zyada hoga, aur ghere ke kinaare par kam. Ye theek hai, jab tak chooze garmi ke chaaron or chaude, barabar ghere me aaram kar rahe hon.
5. Thermometer se zyada choozon ko padhiye
Thermometer hawa batata hai; chooze batate hain ki unhe kaisa lag raha hai. Andar jaane se pehle darwaze se chupchaap unhe dekhiye.
| Kya dikhe | Matlab | Kya karein |
|---|---|---|
| Chooze heater ke neeche ya paas kas kar jhund banaye, zor-zor se chee-chee | Thand zyada | Garmi badhaiye, brooder thoda neeche kijiye, thandi hawa aur thandi zameen jaanchiye |
| Chooze heater se door, guard ke paas, munh khol kar saans, pankh latke | Garmi zyada | Garmi kam kijiye ya brooder upar kijiye; thodi hawa badhaiye |
| Chooze ghere ki ek taraf ikatthe | Doosri taraf se thandi hawa, ya garmi/roshni barabar nahi | Daraar dhoondh kar band kijiye; parde aur heater ki jagah dekhiye |
| Chooze barabar faile, kuch kha rahe, kuch pee rahe, kuch aaram kar rahe; halki chee-chee | Aaram me | Aise hi banaye rakhiye |
| Koyle ya gas heater ke paas chooze sust, lete hue, munh khol kar saans | Gas (CO) ki dikkat ho sakti hai | Turant hawa dijiye, heater aur chimney jaanchiye |
Do aur tareeke: chooze ke pair apne gaal ya gardan se lagaiye; thande pair matlab thandi zameen. Aur din ki sabse zaroori jaanch raat 2–4 baje ki hai, sabse thanda samay, jab heater dheeme pad jaate hain aur zyadatar thand isi samay lagti hai.
6. Jagah (density) aur dheere-dheere ghera badhana
Choozon ko chhoti jagah me shuru karne se fuel bachta hai aur chooze garmi, daana aur paani ke paas rehte hain. Par samay par jagah nahi badhayi to bheed hoti hai, litter geela hota hai aur badhat rukti hai. Khuli side wale shed ke liye saamanya andaaza:
| Umar | Prati chooza jagah (lagbhag) | Prati sq ft chooze (lagbhag) | Kya karein |
|---|---|---|---|
| Din 1–3 | 0.3–0.35 sq ft | 3–3.5 | Garmi ke chaaron or chhota ghera |
| Din 4–7 | 0.4–0.5 sq ft | 2–2.5 | Har 2–3 din me guard bada kijiye |
| Din 8–14 | 0.6–0.75 sq ft | 1.3–1.7 | Guard dheere-dheere hataiye, shed ka aur hissa kholiye |
| Din 15–21 | 0.8–1 sq ft | 1–1.25 | Lagbhag 18–21 din tak poora shed |
- Ghera din ki garmi me bada kijiye, shaam ko nahi.
- Shed ka naya hissa kholne se pehle use aur uska litter garam kar lijiye, taaki chooze thandi zameen par na jaayein.
- Guard ke saath feeder aur drinker bhi bahar ki or khiskaiye, taaki wo barabar faile rahein.
- Aakhri density shed, mausam aur lakshya wazan par nirbhar hai. 2–2.5 kg ke broiler ke liye kai farm lagbhag 1 sq ft prati pakshi rakhte hain; apne shed ke liye integrator ya doctor ki salah maniye.
7. Feeder aur drinker ki sankhya
| Saamaan | Din 1–7 (lagbhag) | Din 8–14 (lagbhag) |
|---|---|---|
| Chick feeder tray / kaagaz | 100 choozon par 1 tray, saath me 2–3 din kaagaz par daana | Dheere-dheere tube ya lambe feeder par laiye |
| Tube/gol feeder | Din 4–5 se tray ke paas rakhna shuru kijiye | Lagbhag 30–40 pakshi par 1 (size ke hisaab se) |
| Jar/fount drinker (3–5 litre) | 50–75 choozon par 1 | Pakshi badhne par bell drinker jodiye |
| Nipple drinker | Lagbhag 10–15 choozon par 1 nipple, aankh ki oonchai par | Line upar kijiye taaki pakshi thoda upar gardan karke piyein |
- Chooze badhne ke saath drinker ka kinaara unki peeth ki oonchai par rakhiye, taaki paani litter me na gire.
- Jar drinker roz saaf kijiye. Daana aur paani ke bartan kabhi khaali na rahein.
- Drinker ke aaspaas ka geela litter roz subah hataiye aur sookhi bhoosi daaliye. Zyada jaankari: sardi me geela litter aur patli beet.
8. Brooding me aant ki sehat
Ande se nikalte samay chooze ki aant me achhe bacteria lagbhag nahi hote. Pehle din tay karte hain ki wahan kaun se bacteria basenge. Achhi brooding (garmi, jaldi daana aur saaf paani) iski neev hai. Iske saath kai kisan pehle dinon me probiotic dete hain, taaki aant me achhe bacteria basein, zardi pachne me madad mile aur beet saamanya rahe.
Aant ki sehat · bestseller
Remipro
Probiotic, prebiotic (MOS) aur Saccharomyces, saath me betaine, methionine aur vitamin C. Aant ke achhe bacteria lautata hai, patli beet ghatata hai, pachan aur FCR sudharta hai, coccidiosis se ubharne me madad karta hai aur bhoori/coffee rang ki beet theek karta hai.
Matra: Roz ki aant sehat ke liye 1 g prati 8 kg wazan ya 1 g prati litre paani; patli beet aur infection me 1 g prati 5 kg wazan ya 2 g prati litre; brooding me 1 g prati 100 chooze.
500 g ₹626MRP ₹950
Product ki jaankari: Remipro. Probiotic garmi ya saaf paani ki jagah nahi leta; choozon ko thand lag rahi ho to pehle temperature theek kijiye.
9. Kam se kam hawa banam garmi bachana
Sardi me yahi sabse mushkil santulan hai. Kisan garmi bachane ke liye sab band kar dete hain, par choozon ko oxygen chahiye, aur shed se nami, ammonia aur heater ki gasein bahar nikalni chahiye. Band, seelan bhara shed CRD, E. coli aur infectious bronchitis ki badi wajah hai. Murgiyon me Infectious Bronchitis (IB) ke baare me padhiye, jo kam hawa wale sardi ke shed me tezi se failta hai.
- Kam se kam hawa (minimum ventilation) ka matlab hai hawa ka thoda-thoda, niyamit badalna, shed ko poora kholna nahi. Sabse thandi raat me bhi kuch taazi hawa aati rahe.
- Parde wale shed me hawa se ulti taraf parde ka upari hissa kuch inch neeche kijiye, khaaskar dopahar ki garmi me. Parde neeche se kabhi mat uthaiye.
- Exhaust pankhe hon to unhe lagataar nahi, timer par chalaiye (jaise har kuch minute me thodi der).
- Naak se jaanch: andar jaate hi ammonia ki gandh aaye ya aankhein jalein, to hawa kam hai. Ammonia lagbhag 10 ppm se neeche rakhiye. Subah pardon ke andar zyada paani ki boondein bhi kam hawa ka sanket hain.
- Aane wali thandi hawa choozon ke upar se jaaye, un par nahi. Choozon ki oonchai par thandi hawa unhe thithura deti hai, chahe thermometer theek dikhe.
- Din 10 ke baad hawa dheere-dheere badhaiye, kyonki pakshi zyada garmi aur nami banate hain.
Sardi ke poore prabandhan ke liye dekhiye: poultry farming me sardi ka prabandhan.
10. Nami (humidity)
- Pehle dinon me lagbhag 60–70% nami choozon ko sookhne se bachati hai. Pehle hafte ke baad lagbhag 50–65% theek hai.
- Bahut sookha (koyle aur bijli ke heater me aam): choozon me paani ki kami, dhool, shuruaati maut aur guda par beet chipakna badhta hai. Heater ke paas choozon ki pahunch se door khule bartan me paani rakhna, ya raaste par halka paani chhidakna madad karta hai.
- Bahut geela (band shed me aam): geela litter, ammonia, thandi zameen, pair aur aant ki dikkat. Minimum ventilation badhaiye aur geela litter hataiye.
- Choozon ki oonchai par tanga sasta digital thermo-hygrometer temperature aur nami dono batata hai.
11. Pehle do hafte ka roshni program
- Din 1–7: lagbhag lagataar roshni (kareeb 23 ghante roshni, 1 ghanta andhera), choozon ki oonchai par tez aur barabar roshni, taaki daana-paani aasani se mile. 1 ghante ka andhera unhe bijli katne par ghabrane se bachata hai.
- Din 7–8 se: dheere-dheere andhere ka samay badhaiye (kadam-kadam par raat me lagbhag 4–6 ghante andhera tak), aur roshni kuch kam kijiye. Andhera pairon ki sehat, immunity aur barabar badhat me madad karta hai.
- Brooding jagah me andhere kone aur gehri chhaaya na ho; chooze roshni wali jagah par bheed lagate hain.
- Agar aapki nasl ki guide ya integrator doosra program bataye, to wahi maniye.
12. Din 7 aur din 14 par wazan
- Din 7 par ghere ke alag-alag hisson se kam se kam 50–100 chooze (ya flock ke lagbhag 1–2%) tauliye.
- Lakshya: ek din wale wazan ka lagbhag 4.5–5 guna. 40 gram ka chooza 7ve din lagbhag 180–200 gram ka hona chahiye.
- Ausat kam ho to pehle brooding temperature (khaaskar raat ka), paani tak pahunch, kaagaz par daana, feeder ki jagah aur choozon ki quality dekhiye.
- Barabari bhi dekhiye. Bahut chhote chooze zyada hon, to unhe heater ke paas alag ghere me rakhiye, zyada daana-paani ke saath.
- Din 14 par phir tauliye aur apni nasl ke wazan chart se milaiye (hatchery ya integrator se mil jaata hai).
- Pehle hafte ki maut aam taur par 1% se kam rehni chahiye. Zyada ho to doctor ko bulaiye aur mare chooze postmortem ke liye bhejiye.
13. Thand me immunity aur teekakaran
Thand, safar, bheed aur pehle teeke, sab chhote choozon par tanaav daalte hain. Teekakaran ka schedule apni hatchery ya doctor se lijiye (ye ilaake aur integrator ke hisaab se badalta hai). Teeka subah saaf, thande, bina sanitizer wale paani me dijiye. Hamara sardi me broiler dawa schedule batata hai ki har kadam kab aata hai. Teeke ke aaspaas aur kadi thand ke tanaav me antioxidant immunity sahara madad kar sakta hai:
Immunity booster
Nexamune
Vitamin E, selenium, amla, tulsi aur ashwagandha extract, vitamin C, vitamin D aur niacin: immunity ko sahara dene wali antioxidant dhaal. IB, ND, Gumboro, IBH aur LPAI jaisi beemariyon me immune system ko sahara, CRD aur saans ki doosri dikkaton ki gambhirta kam karta hai, aur teeka fail hone ki sambhavna ghatane me madad karta hai.
Matra: Immunity aur tanav ke liye 1 ml prati litre paani ya 15 ml prati 100 pakshi; teeke se pehle aur baad 2 ml prati litre paani; viral beemari failne par 25–30 ml prati 100 pakshi.
1 L ₹644MRP ₹1,190
Product ki jaankari: Nexamune. Supplement label ke anusaar taaze paani me dijiye, aur koi dawa ya antibiotic andaaze se mat dijiye; pehle doctor se poochhiye.
14. Din 1 se din 14 ki roz ki checklist
| Din | Choozon ke paas temperature | Mukhya kaam |
|---|---|---|
| Chooze aane se pehle | Zameen 28–30°C, hawa 32–33°C | 24–48 ghante pehle garam kijiye, 4 inch litter, double parde, ghera taiyar, drinker bhare, CO aur gas jaanch, backup garmi taiyar |
| Din 1 | 32–33°C | Chooze giniye aur jaanchiye, kuch tauliye, chooze aate hi Easy Brood 70 g/1000, phir Vitaden H 30 ml, kaagaz par daana, chonch duboiye, 8 ghante par pota jaanch, raat ki jaanch |
| Din 2 | 32–33°C | Easy Brood 70 g, phir Alceau 15 g, 24 ghante par pota jaanch (95% se zyada), kamzor chooze alag kijiye, baar-baar daana, raat 2–4 baje vyavhaar dekhiye |
| Din 3 | 32–33°C | Pyrocal B 40 ml, phir Alceau 15 g, ganda kaagaz hataiye, drinker saaf kijiye, maut likhiye, nami jaanchiye |
| Din 4 | 31–32°C | Subah ke paani me ND-IB teeka (usme aur kuch nahi), agle paani me Alceau 15 g, Din me pehli baar ghera bada kijiye, kuch tube feeder rakhiye, geela litter hataiye |
| Din 5 | 31–32°C | Naabhi aur guda par chipki beet dekhiye, beet ka rang dekhiye, teeka ho to schedule se dijiye |
| Din 6 | 30–31°C | Drinker ki oonchai theek kijiye, subah ammonia jaanchiye, fuel aur gas ka stock dekhiye |
| Din 7 | 30–31°C | 50–100 chooze tauliye (lakshya 4.5–5 guna), pehla andhera samay, pehle hafte ki maut dekhiye |
| Din 8 | 29–30°C | Ghera bada kijiye, nayi jagah pehle garam kijiye, feeder-drinker bahar khiskaiye |
| Din 9 | 29–30°C | Litter halka paltiye, jame hue tukde hataiye, min-max thermometer par raat ka temperature dekhiye |
| Din 10 | 29°C | Minimum ventilation thoda badhaiye, choozon ki oonchai par thandi hawa jaanchiye |
| Din 11 | 28–29°C | Kuch chick tray hataiye, tube feeder par zyada bharosa; barabari dekhiye |
| Din 12 | 28–29°C | Teeka ho to schedule se dijiye; paani ki line saaf kijiye |
| Din 13 | 28°C | Shed ka aur hissa kholiye, raat me parde band, saans ki awaaz par nazar |
| Din 14 | 28°C | Phir tauliye, nasl ke chart se milaiye, bache guard hataiye, agle do hafte ki yojana |
Har din: subah maut giniye aur likhiye, daana-paani bhariye, geela litter hataiye; dopahar me dhoop ho to parda upar se thoda kholiye; shaam ko parde band, heater, gas aur backup jaanchiye; raat 2–4 baje choozon ka failaav, temperature aur dhuaan/gas dekhiye.
15. Sardi ki brooding me aam galtiyan
- Chooze aane par hi heater chalu karna. Hawa ek ghante me garam ho jaati hai, zameen ko ek din ya zyada chahiye.
- Chhat ke paas temperature naapna, choozon ki oonchai par nahi, aur sirf hawa dekhna, litter nahi.
- Thand ke darr se shed poora band kar dena, jisse ammonia, gas, geela litter aur saans ki beemari.
- Band shed me khuli angithi, ya bukhari ke pipe se dhuaan risna.
- Pehle din tanki ka barf jaisa thanda paani.
- Kam drinker aur feeder, ya unhe garmi se door rakhna.
- Raat me jaanch na karna. Zyadatar thand aadhi raat se subah ke beech lagti hai.
- Ghera bahut jaldi bada karna ya garmi jaldi ghatana, ya thandi shaam me karna.
- Brooding jagah me chaukor kone, jahan chooze ek-doosre par chadh kar dab jaate hain.
- Din 7 par wazan na karna, jisse kharab shuruaat batch ke aakhir me pata chalti hai.
- Shuruaati maut me brooding theek karne aur doctor bulane ki jagah andaaze se antibiotic dena.
16. Doctor ko kab bulayein
Aksar poochhe jaane wale sawaal
Sardi me chooze aane se kitne ghante pehle brooder chalu karein?
Kam se kam 24–36 ghante pehle, aur kadi thand ya bade shed me 48 ghante pehle tak. Choozon ke dibbe kholne se pehle litter 28–30°C aur choozon ki oonchai par hawa 32–33°C ho.
Pehle din broiler choozon ko kitna temperature chahiye?
Pehle 3 din choozon ki oonchai par lagbhag 32–33°C (90–91°F), phir dheere-dheere ghata kar din 7 tak lagbhag 30–31°C aur din 14 tak 28°C. Hamesha choozon ka failaav dekh kar pakka kijiye.
Kya brooding me angithi surakshit hai?
Khuli angithi se carbon monoxide aur dhuaan nikalta hai, ye sabse khatarnak tareeka hai. Majboori ho to bahar sulgaiye, dhuaan band hone par hi andar laiye, pardon se door rakhiye, aur shed kabhi poora band mat kijiye. Chimney wali bukhari ya gas brooder zyada surakshit hai.
Kya sardi me raat ko saare parde band kar dein?
Thandi hawa rokne ke liye band kijiye, par hawa se ulti taraf upar thodi jagah khuli chhodiye taaki kuch taazi hawa aaye. Poora band shed ammonia, nami aur heater ki gasein jama karta hai.
7ve din broiler chooze ka wazan kitna hona chahiye?
Ek din wale wazan ka lagbhag 4.5–5 guna, yaani 40 gram ke chooze ka lagbhag 180–200 gram. Apni nasl ke wazan chart se milaiye.
Kya choozon ko cheeni ya glucose ka paani de sakte hain?
Gud, cheeni aur namak ka paani mat dijiye. Cheeni aant ke bure bacteria ko badhati hai, jisse beet patli aur yolk sac infection ho sakta hai. Din 1 aur 2 ko Easy Brood 70 g prati 1000 chooze dijiye, aur din 2, 3 aur 4 ko agle paani me Alceau 15 g prati 1000 chooze (din 1 se 4 ka plan dekhiye). Uske baad saada, saaf, gunguna paani dijiye.
Chick guard kab hatayein?
Din 4 se har 2–3 din me ghera bada kijiye, aur mausam ke hisaab se lagbhag din 10 se 14 ke beech dheere-dheere hataiye. Teesre hafte me bhi thandi raaton ke liye garmi taiyar rakhiye.
Sardi broiler series ki baaki guide
Ye bhi kaam ke: aaj ka broiler rate · poultry laagat aur munafa calculator · sardi me geela litter · IMN poultry products
Ye saamanya jaankari hai. Apni nasl ki guide aur hatchery ki salah bhi maniye, aur koi bhi dawa dene se pehle doctor se poochhiye.